5 THINGS ATHLETES SHOULD DO FOR INJURY-FREE SHOULDERS

INTRODUCTION

Injuries happen on the sports field and while we can potentially reduce the risk, they will always occur. However, the number one priority for all S&C coaches in my opinion is to ensure their athletes do not get injured in the weight room. Injuring athletes with general training (i.e. resistance training) is something we have a huge control over and therefore, we are in a position to significantly prevent.

Seeing as the shoulder complex is one of the most injured regions with resistance training1, there are a number of things we can do to ensure our athletes stay healthy in the gym. Here are 5 things coaches should ensure their athletes do that I believe have the potential to significantly reduce injury risk at the shoulder complex for athletes.

  1. Make sure an athlete can pass the Bilateral Shoulder Elevation Test

I value bilateral shoulder elevation test (BSET) massively as a basic screen in order to understand how an athlete moves at the shoulder and spine. In fact, I wrote a whole article about it for SCJ.2

If an athlete can’t get their arms above their head without using compensations, they have no business doing overhead lifting. This is not only applicable for pressing movements. If an athlete can’t get their hands above their head, what do you think the bottom position of their chin up will look like? The likelihood is there will be significant stress placed on a number of structures to make up for the loss of motion. And under high loads (such as what is seen in the chin up) this could be seriously problematic.

This may even result in excessive loading being placed on structures far from the shoulders. If an athlete lacks shoulder elevation and they need to get their hands above their head to finish their Press, it’s not uncommon to see them go straight to a spinal extension pattern to get the rep. Do this enough times and it could cause problems in the future.

So making sure the athlete can get into good positions before you load these patterns will go a long way in ensuring they preserve the health of not only their shoulder complex, but also the neighbouring segments such as the lumbar spine.

Figure 1 shows how to perform the BSET. The findings can be interpreted using the model in Figure 2.

Figure 1

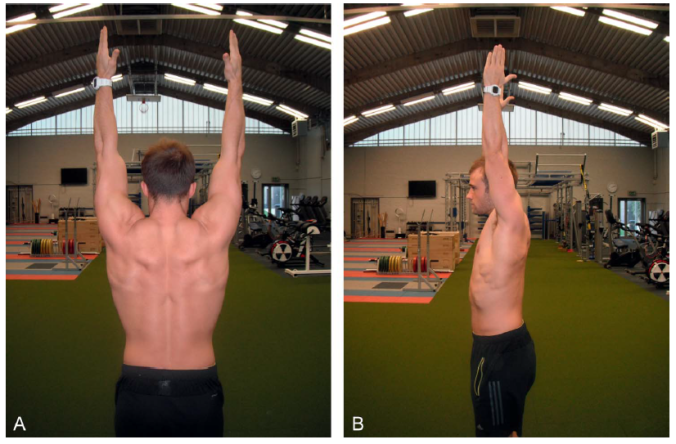
Figure 1. The BSET is performed with the athlete reaching above their head with extended elbows. The arms should move in the scapula plane and at the top position, the coach should determine if the athlete has used the thoracic spine, scapulothoracic articulation and glenohumeral joint sufficiently to achieve this position.

  1. Chase mobility… If the athlete doesn’t already have it

Because the scapula and therefore the humerus reside on the thoracic spine, I always teach students that the thoracic spine is like the foundation for the house to be built upon (the house being the scapula and the humerus in this analogy). Wherever the thoracic spine goes, the scapula goes and that directly impacts what happens at the glenohumeral joint.

A mobile thoracic spine is crucial in order to get the scapula into a good place. Extending the thoracic spine facilitates upward and posterior rotation of the scapula. These movements are important for shoulder health as they move the acromion further from the humeral head, decompressing the subacromial tissue. So from this standpoint, poor thoracic spine mobility may be associated with the onset of external shoulder impingement in athletes who lift above head. You can read more about this in a previous blog post I have on here.

This is exactly the same for the scapula downward rotators. The pectoralis minor, levator scapulae and rhomboids will prevent the scapula from achieving the 50-60˚ of upwards rotation it likely needs to in order to support glenohumeral function.

And it is no different with the muscles that limit glenohumeral joint elevation. A tight pectoralis major, latissimus dorsi or teres major will all cause a failed BSET.

Importantly, once the BSET has been performed by an athlete, the coach can use the findings to get some idea as to what muscles/joints might be limiting the movement. Likewise, the BSET can be used to identify what muscles aren’t functioning optimally in elevating the shoulder (see Figure 2).

Figure X

Figure 2. Process for identifying a potential restriction during the BSET. ST = Scapulothoracic, GH = Glenohumeral

These findings can be confirmed through isolated testing. My article Shoulder Function During Overhead Lifting Tasks: Implications for Screening Athletes in the NSCA’s SCJ shows all the relevant tests that may be employed by the S&C coach to identify mobility restrictions. This article can be found here:

https://www.nsca.com/education/articles/shoulder-function-during-overhead-lifts/

So if the athlete doesn’t have sufficient mobility, then get the mobilisations/stretches in the programme. When deciding how to prescribe mobility/flexibility work, have the athlete do the isolated test for a baseline score, then implement an intervention (as shown in Figure X) and see if it changes their baseline. If it doesn’t, try something else.

  1. Train the scapula upward rotators

The scapula upward rotators are hugely important for the health of the glenohumeral joint. I’ve already spoken about why scapula upwards rotation is important for preventing external impingement, but upwards rotation is also important for maintaining the length-tension relationship of the rotator cuff muscles. A scapula that doesn’t sufficiently upwardly rotate usually results in a larger amplitude of movement at the glenohumeral joint leading to greater lengthening of some of the cuff muscles, causing a reduced overlap of its actin and myosin filaments.

The muscles that upwardly rotate the scapula are the trapezius (predominantly the upper and lower fibres) and the serratus anterior. Each one of these muscles are tremendously important for the function of the shoulder and should be trained in most athletes. Here are a few example exercises to strengthen these muscles.

  • Upper trapezius: Snatch grip shrugs and overhead shrugs – basically shrugging with shoulder abducted beyond 30˚ as this is required for the upper trap to elevate the scapula.
  • Lower trapezius: Prone V’s and band W’s.
  • Serratus anterior: Any crawling movement done in prone and loaded push ups (ensuring scapula protraction at the top).
  1. Train the rotator cuff muscles

This has been a controversial topic in the past, with some practitioners suggesting that isolated rotator cuff training is useless and doesn’t reduce injury risk. I don’t buy that at all as there is some good evidence to suggest that weak external rotators increases the risk of incurring a shoulder injury.3

Facilitating a muscle imbalance through poor programming is a great way to disrupt the arthrokinematics of a joint and degrade tissue. When we consider the functional role of the rotator cuff muscles is to centrate the Glenohumeral joint, it’s not hard to see that if they are weak relative to the pectoralis major (as an example), shoulder health may become compromised. Therefore, if your athlete can BB bench press 165kg for 1 rep but can only do a side lying DB external rotation with 4kg for 10, it is unlikely to work out well for the athlete in the long run.

In my own practice as a coach, I use the athlete’s bench press to guide where their rotator cuff strength should be. As the bench press involves a high level of strength from the pectoralis major, anterior deltoid and latissimus dorsi, comparing this lift to rotator cuff strength can inform the coach as to the relative strength of the athlete’s stabilisers. I like to see athletes be able to do rotator cuff work with approximately 8-10% of their 1RM Bench Press for 8-10 reps. So if a guy has a 120kg Bench, I think he should be able to do side lying DB external rotations with approximately 9-12kg dumbbell for 8-10 reps. I use the approach with some of the scapula work I spoke about previously.

I’ll be the first one to say that I’m not aware of much research to support this ratio. I also think a number of variables play into the level of appropriateness of this ratio. As an example, if a powerlifter can Bench Press 250kg, do I think they should be able to do rotator cuff work for reps with a 25kg dumbbell? Probably not. But if that athlete can only do 4kg for 8 reps, I think it may be a problem.

Although I appreciate there are holes in this concept, I believe it’s built on a robust theoretic model. It’s something I have used a lot with good success in the athletes I’ve worked with. At the very least, this concept can be used with athletes to motivate them to strengthen some key shoulder stabiliser muscles.

  1. Monitor ALL overhead lifting

This is a trap I’ve fallen into before with athletes. I’ll calculate the exposure to traditional overhead lifting (e.g. chin ups, press, snatch, etc.), but won’t factor in exercises such as abs rollout. Even stuff like wall angels. Then, all of a sudden, my athletes are doing tons of high load overhead work that I’m not considering as volume that may be problematic (note: a wall angel can be high load if you aren’t very mobile. In order to overcome the stiffness of the tight muscles, high level contractions of the shoulder musculature are needed, therefore exposing the shoulder complex to high loads).

This is a major issue as exposure is primary risk factor for virtually all injuries (if you never run, you’re unlikely to tear the long head of the biceps femoris). In this sense, if we don’t manage exposure, then we aren’t controlling a primary risk factor to shoulder injuries.

I would also add other exercises that directly loads the glenohumeral joint into this calculation. If you prescribe upright rows, you should consider the volume allocated to this exercise. Same with lat raises. In fact, any exercises performed with the shoulder elevated above the 60˚ associated with the painful arc is of interest.

Once you know the volume that the shoulder complex is being exposed to, you can programme accordingly to ensure huge spikes in overhead lifting volume don’t occur in the weight room.

SUMMARY

Hopefully this post has given some coaches some ideas for programming for the shoulder complex. For the most part, each variable discussed is relatively obvious, but its surprising how many times these things fall out of an athletes programme.

REFERENCES

  1. Kolber, M.J., Beekhuizen, K.S., Cheng, M.S.S. and Hellman, M.A., 2010. Shoulder injuries attributed to resistance training: a brief review. The Journal of Strength & Conditioning Research, 24(6), pp.1696-1704.
  2. Howe, L.P. and Blagrove, R.C., 2015. Shoulder Function During Overhead Lifting Tasks: Implications for Screening Athletes. Strength & Conditioning Journal, 37(5), pp.84-96.
  3. Clarsen, B., Bahr, R., Andersson, S.H., Munk, R. and Myklebust, G., 2014. Reduced glenohumeral rotation, external rotation weakness and scapular dyskinesis are risk factors for shoulder injuries among elite male handball players: a prospective cohort study. British journal of sports medicine, pp.bjsports-2014.

TRAINING ATHLETES WITH FEMORAL ACETABULAR IMPINGEMENT IN THE WEIGHT ROOM

INTRODUCTION

At this point in time, it’s pretty clear that our ability to predict injury using traditional screening tools is rubbish. This is especially the case when we use screens that have little resemblance of sports skills that are relevant to the athlete. Here is a recent meta-analysis that demonstrates the point I’m making.

So if general screens don’t predict injury, are they useless? I don’t believe so. Understanding how an athlete presents before participating in a strength and conditioning (S&C) programme is really the primary reason for screening athletes from our perspective. If we can appreciate how they are put together and how they organise themselves during movements, we can potentially identify exercises that are at that point in time, contraindicated.

Identifying structural maladaptation’s or pathology are some of the variables that may contraindicate an athlete for certain exercises. If there were field-based screens (and there aren’t) that could identify type III acromion’s, then maybe we could be a little bit more accurate in individualizing the dosages for overhead movements in preserving rotator cuff health.

One structural abnormality that should be considered by S&C coaches in the prescription of lower extremity exercises is femoral acetabular impingement (FAI). Throwing athletes with FAI into a weight room programme that loads the hips, may have the potential to increase injury risk. As such, this post will discuss ways to identify athletes with FAI along with strategies for manipulating key variables in the resistance training programmes for athletes with FAI.

FEMORAL ACETABULAR IMPINGEMENT

Femoral acetabular impingement is the term used to describe the bony overgrowth seen at the hip joint. This structural abnormality may occur at either the femoral neck-head junction (called a CAM) or the anterior-superior aspect of the acetabulum (called a PINCER). There is a third type whereby the athletes present with both types of bony overgrowth (called a mixed CAM-PINCER). Figure 1 shows a CAM and PINCER.

FAI

Figure 1. Image A shows the CAM deformity, whereas B shows a PINCER deformity.

This structural pathology may cause impingement of tissues surrounding the hip joint, such as the acetabular labrum. This occurs during end ROM hip flexion, internal rotation, adduction, or a combination of these movements.

Femoral acetabular impingement is particularly prevalent in athlete populations and is extremely common in sports with a high exposure to changes of direction during running (such as American Football and Football). This can present as major issue for athletes in these sports, as FAI is a pathology associated with groin pain. In fact, patients with long standing groin pain have a high prevalence of FAI. Furthermore, many individuals with FAI are asymptomatic and therefore, may have an issue bubbling under the surface. Exposing these athletes to exercises loading the hip joint in flexion, internal rotation or adduction may be all that is needed into changing their status from healthy to injured.

It should be recognised that impingement at the hip joint is not only due to bony abnormalities. Repetitive exposure to end ROM hip flexion, adduction or internal rotation may also cause impingement without a structural pathology being present. Likewise, poor joint alignment during squatting type exercises (i.e. excessive knee valgus) may also cause symptoms of FAI. In fact, I published a case study here in PSCJ of an athlete with poor squat mechanics who presented with symptoms of FAI.

IDENTIFYING ATHLETES WITH FAI

This subheading is misleading, as it is not the S&C coach’s role to diagnose athletes with FAI. However, if some generic screening has the ability to find an athlete who may have FAI before loading their hips up in the weight room, it might be possible to catch them in the net before causing problems. Here are three ways to identify an athlete that may have FAI:

  1. Although squats are not a good test for diagnosing FAI, athletes who demonstrate limited hip flexion ROM during the descent, report pain or a “pinching” sensation in the anterior aspect of the hip joint should considered for referral to a medical practitioner.
  2. Femoral acetabular impingement is aggravated in athletes with end ROM hip flexion, internal rotation or adduction. When an athlete presents with either limited ROM or pain on any of these movements during passive screening, they should be considered for referral.
  3. Combinations of hip flexion, adduction and internal rotation are extremely problematic for athletes with FAI. As such, this is one of the ways a clinical impression (diagnosis is achieved through X-Ray) may be developed for FAI. Pain on the provocative FADIR test is a positive sign that an athlete may have FAI (here is a nice video on how this test is performed).

At this point, if the S&C coach believes an athlete is suffering from FAI, immediate referral to a medical practitioner is recommended.

TRAINING AROUND FAI IN THE WEIGHT ROOM

In terms of correcting FAI, surgery may be recommended by the medical practitioner if a bony pathology exists. If the athlete is not going to have surgery to remove the excess bone, or no bony pathology has been identified yet symptoms are present, the S&C coach should consider making some fundamental modifications to programming and exercise performance. Here are a few suggestions:

Be cautious with applying textbook technical models

The typical technical models that get spouted out for lower body exercises are mostly appropriate. However, we have to allow the athlete to move in ways that fit their morphology.

Squatting bilaterally with the feet straight ahead or positioned 5-to-1 on a clock face at shoulder width won’t necessarily fit every athlete. In order to prevent impingement in athletes with FIA, squatting with some additional hip external rotation and/or abduction through toeing-out or widening the stance respectively, may be beneficial as it allows them to go into hip flexion without combining provocative movements (i.e. flexion + internal rotation).

This is less of an issue for exercises such as RDL’s that do not get to end ROM at the hip joint.

 Careful with single-leg squatting

The whole single-leg vs. double-leg training is plain stupid in my opinion. For the most part, when selecting exercises, it’s about finding movements that work for the athlete in front of you and then progressively overloading that exercise. Whether it’s single-leg or double leg squatting will have no impact on athletic performance if those movements are general in nature.

That said, I would argue that single-leg squatting in athletes with FAI doesn’t work as well as bilateral squatting in my experience (everything else being equal). The issue is that with double-leg squats, the athlete can move into hip flexion with concurrent hip abduction and external rotation.

However, with single-leg squats, this just isn’t the case. The hip flexion in single-leg squatting comes with more relative hip adduction and internal rotation (comparatively). See Figure 2 for an example.

DL vs SL
Figure 2. Note the change in hip position in the frontal and transverse plane between double- and single-leg squatting.

Cut the ROM short

This will likely irritate some purists who think every squat in the weight room should be arse-to-grass. While full ROM is great if the athlete can do it without issues, athletes with FAI won’t do well with tons of loaded hip flexion to end ROM. Cutting the ROM even an inch or two short may prevent impingement and help the athlete out in the long run. This means exercises such as front foot elevated split squats and snatch grip deadlifts from a deficit doesn’t make the cut in the programming for an athlete with FAI.

And I challenge anyone to show me evidence that squatting a few inches from full ROM has a significant negative impact on athletic performance. On the other hand, it’s not difficult to find evidence to suggest injury ruins athletic performance and can be costly in the long run.

So if you do choose to use single-leg exercises for the benefits they offer, shortening the ROM may be important to prevent impingement at the hip.

Avoid stretching into hip flexion, adduction and internal rotation

This is obvious but worth saying – stretching in positions of pain provocation is for most part, inappropriate. This is similar to the sleeper stretch that replicates the Hawkins and Kennedy test. In individuals with shoulder impingement, this will only make their symptoms worse.

Sort foot alignment out

The function of the hip is heavily reliant on the function of the foot complex during closed chain movements. When squatting (both DL and SL), if the foot pronates, it will drive the hip to internally rotate. This occurs due to joint coupling in the lower extremity and can be read about here.

So when squatting, if the athlete pronates at the foot (causing internal rotation at the tibia and femur) then the end range hip flexion will likely be combined with internal rotation at the hip, which is the provocative position for FAI.

As these positions should be avoided in the weight room, ensuring an athlete maintains subtalar joint neutral is vital for a healthy hip joint. Figure 3 shows the difference in lower extremity alignment at the bottom of the squat when pronating the foot vs. keeping the foot in a position of relative neutral.

Pro vs Neutral

Figure 3. Squatting with a pronated foot position versus a neutral alignment at the subtalar joint. Note the difference in hip joint position.

Ensure sufficient ankle dorsiflexion ROM is present

Poor ankle ROM during squatting type movements have been shown to increase pronation at the foot in order to allow the tibia to continue to its forward rotation. As such, this ties into the point above, with pronation causing increases in hip internal rotation.

Also, athletes who squat with poor ankle dorsiflexion ROM also tend to increase the amount of hip flexion ROM they move through. His is shown in the athlete in Figure 4 during an overhead squat. This athlete possessed very little ankle dorsiflexion ROM and as such, moved through excessive hip flexion early in the ROM.

This is obviously problematic as now the athlete with FAI is heavily relying on full ROM hip flexion to lower their centre of mass whilst potentially moving into hip internal rotation in order to accommodate pronation at the foot.

OH Squat

Figure 4. The bottom position for an athlete performing the overhead squat with limited ankle dorsiflexion ROM.

Correct pelvic alignment

This is especially important during exercises that require hip flexion. If an athlete holds their pelvis in a position of excessive anterior tilt, this will reduce their capacity to flex the hip during squatting type exercise, as the hip will bang into the rim of the acetabulum earlier in the movement. This may also exhaust their end ROM in the other planes. For example, if an athlete excessively anteriorly tilts the pelvis, their capacity to internally rotate the hip joint may be limited meaning they find end range sooner potentially exacerbating symptoms due to the faulty pelvis position.

SUMMARY

Femoral acetabular impingement is common in many athlete populations. As such, it is important S&C coaches can screen an athlete to ensure the exercises they prescribe are appropriate. Athletes should be referred for medical screening if they report pain or “pinching” in the hip during squatting type exercises, have limited ROM in hip flexion, internal rotation and/or adduction or have a positive FADIR test. If an athlete is diagnosed with FAI, the modification to exercises suggested in this post will help prevent exacerbation of symptoms while providing the athlete with a training stimulus to improve athletic performance.

USING MOVEMENT QUALITY RATIOS TO DIRECT THE TRAINING FOCUS

INTRODUCTION

For decades, Weightlifting coaches have used lifting ratios to establish where an athlete’s weakness lies. A very basic example of this would be if a weightlifter had a back squat of 230kg, yet could only squat clean 155kg. The coach would be pretty confident that the athlete has enough leg strength to squat clean higher loads, but lacks either the explosive strength or the technical ability in their present state.

Another example may be for the bench press. A coach could compare an athlete’s close and wide grip bench press to establish the maximal strength levels of the synergistic triceps and pectoral muscles. If an athlete could close grip bench press 150kg but with a wide grip, only bench press 140kg, the coach could be pretty confident that the athlete lacks the pectoral strength to bench press greater loads. Therefore, the pectorals would be the focus of the training programme that should, in theory, lead to an increase in the athlete’s bench press strength.

Here are some other examples of how ratios can be used to direct the training focus:

Countermovement: Squat jump: A high CMJ relative to SJ would indicate poor starting strength (or RFD) due to the time constraints of the SJ.

Back squat: Countermovement jump: A high back squat relative to CMJ would indicate high levels of maximal strength relative to explosive strength in the lower extremity.

Back squat: Single leg squat: A high back squat relative to the single leg squat would indicate high levels of maximal strength relative to the “steering” of these forces during single-leg stance.

This same concept can be used for movement quality. Ratios can be used to indicate whether poor movement quality is due to technical issues related to a given skill, or limited mobility/flexibility.

MOVEMENT QUALITY RATIOS

The example I will use here is sprinting but really could be any movement pattern that is relevant to an athlete. During sprinting, limited hip extension can negatively impact the position of the pelvis particularly during the late stance phase, leading to excessive loading of surrounding tissues such as the hamstrings musculature. This is why limited hip extension has been suggested as a risk factor for hamstring injuries during sprinting.

For coaches, some basic videoing and plotting of 2D joint kinematics can help identify if an athlete has the capacity to extend their hip during the late stance phase of sprinting.

In order to identify if this is a mobility issue, the modified Thomas test can be carried out on the athlete (Figure 1). This test can be used to identify if a restriction exists in any of the numerous hip flexor muscles.

IMG_1016

Figure 1. The modified Thomas test is performed with the athlete laying supine on the edge of a plinth. The athlete has the right hip fully flexed with the lumbar spine flattened. The left leg (the tested leg) hangs down and the athlete is encouraged to relax in order for it to be true passive test.


Below is a guide and visual demonstration for interpreting the findings of the modified Thomas test:

Thigh not parallel with the floor = tight psoas major and iliacus

IMG_1017

Knee >90° and not perpendicular to the floor = tight rectus femoris

IMG_1018

Hip abducts and the knee moves away from the midline = tight TFL

IMG_1019

Knee turns out and femur externally rotates = tight sartorius

IMG_1020

A quick side note here – sometimes you can get misleading results with this test. For example, an athlete may have their thigh above parallel with the ground, indicating a tight psoas major and iliacus. However, it could still be rectus femoris causing limited hip extension even if the knee reaches approximately 90° of flexion. In order to identify which muscle is tight, manipulating the position of the knee can inform you as to whom the culprit is. If you extend the athlete’s knee and they can relax into more hip extension, the rectus femoris is likely tight. If the knee extends but they do not move into more hip extension, the psoas major and iliacus is tight. This is due to the biarticular nature of rectus femoris.

INTERPRETING THE RATIO

Once the analysis is complete, we will have a ROM ratio of capacity: utilisation for hip extension (capacity being from the passive ROM test and utilisation being during the specific skill – in this case sprinting). Here are the scenarios that may arise and relevant interpretations:

  1. Poor capacity: Poor utilisation = Mobility focus

If the athlete doesn’t possess the ROM, they won’t have it to use in specific skills. Once hip extension ROM has been achieved, the focus should switch to a technical emphasis in order to teach the athlete to how use their newfound ROM.

  1. Good capacity: Poor utilisation = Technical focus

The athlete has the ROM, but is unable to use it. Therefore, improvements in technique are required and should be the training focus. This should be considered alongside the athlete’s current profile in relevant strength qualities that may impact their ability to use their ROM. 

  1. Good capacity: Good utilisation = Not a factor for consideration

Improvements in sprinting will likely come from greater technical skill (more global) and improving physical qualities that are specific (or relevant) to sprinting.

SUMMARY

Using ratios to direct the training process is not a new concept and has been used for decades. This post has attempted to highlight how with the relevant information, ratios can be used to direct the training process as it relates to movement quality. By identifying mobility capacities relative to the sport skills, coaches can individualise the training process and direct the training focus.