ANKLE DORSIFLEXION RANGE OF MOTION CAN LIMIT SQUAT DEPTH

Introduction

Recently in a discussion on social media, the subject of ankle dorsiflexion range of motion (DF ROM) and its impact on squat performance was raised. Specifically, it was suggested that squat depth is never limited by ankle DF ROM restrictions, and while ankle DF ROM is commonly blamed, the real culprit for the athlete’s poor form is the coach’s lack of skill to effectively coach the movement.

As this statement drove quite a lot of discussion, this blog post will attempt to address this suggestion and offer my own perspective on this topic.

What does the ankle do during the squat?

Fundamentally, when squatting the ankle alongside the hip and knee function to flex (during the descent) and extend (during the ascent) concurrently to varying degrees to lower and raise the centre of mass. During full squats (defined here as when the hamstrings make full contact with the gastrocnemius musculature) it is expected that the ankle, knee and hip rotate in the sagittal plane through their full available ROM (or at least close to) to achieve full depth.

In a commonly cited study, Hemmerich et al. (1) found that during full squats (unloaded), the ankle joint dorsiflexed to approximately 38.5 ± 5.9°, while the knee and hip joint contributed with 153.7 ± 10.4 and 95.4 ± 26.6 of flexion, respectively. This would suggest that the ankle joint, alongside the proximal segments, is quite important in supporting the performance of a full squat by providing a large percentage of its capacity to dorsiflex. Combine this with evidence that ankle DF ROM (tested with the weight bearing lunge test (WBLT)) is significantly lower in individuals who are unable to perform a full squat (2, 3), I believe a strong case can be made for restrictions in ankle DF ROM being a limiter to squat depth.

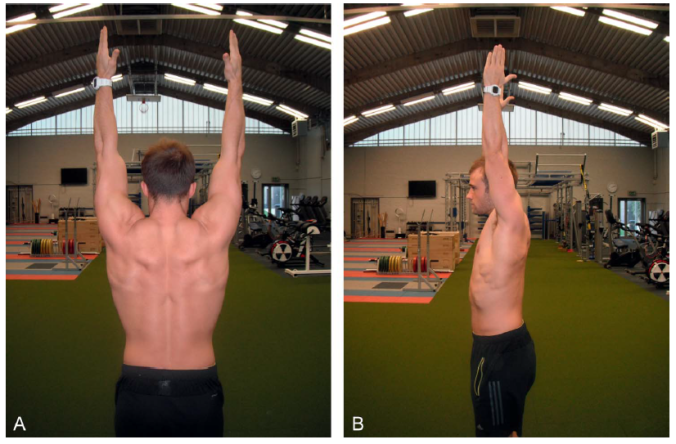
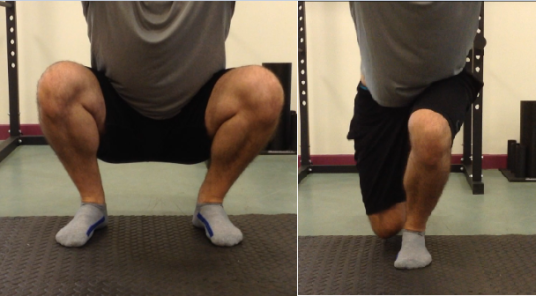
In order to provide visual support for the ankle joints role during squatting, below are images of myself completing a modified weight bearing lunge test (WBLT) (Figure 1), back squat (Figure 2), front squat (Figure 3) and overhead squat (Figure 4). Alongside each figure I’ve screenshot my ankle DF ROM for both ankles during these movements measured using the Dorsiflex app. These values were recorded by taping the phone flat to my tibia (just below the tibial tuberosity), and then squatting and holding the bottom position of the squat variation. Each value represents peak ankle dorsiflexion angle for both the left and right limb. All squats were performed in barefoot with the feet just outside shoulder width apart and slightly externally rotated. Throughout each rep for all of the movements, I’ve done my best to maintain contact with the heel and the ground. *Note: I appreciate there are limitations to this method – I’m just using it to represent a concept.

Modified WBLT 1

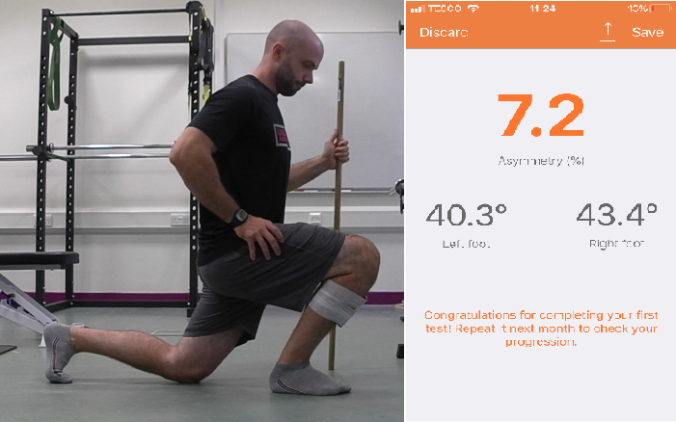
Figure 1. Modified weight bearing lunge test.

Back squat 1

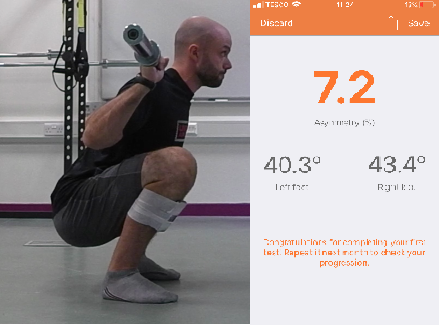
Figure 2. Back squat.

Front Squat 1

Figure 3. Front squat.

OH Squat 1

Figure 4. Overhead squat.

My point in presenting these figures is simple: full squatting, irrespective of variation, requires full ankle DF ROM – or at least close to. The modified WBLT in this case represents my full capacity to dorsiflex the ankle. As you can see, dependant on what limb we are testing my ankles achieve a peak dorsiflexion angle of between 40-43° in this test. If we focus on the right ankle, we can see that the peak ankle dorsiflexion score during each squat variation ranges between 41-45°, with the Overhead Squat requiring the most ROM. In fact, the overhead squat produced greater ROM than the modified WBLT, which is most likely due to the modified WBLT being unloaded and the Overhead Squat being loaded.

Throughout my career as both a Strength and Conditioning Coach and as a Lecturer in higher education, I have recorded hundreds of WBLT and scores of <35° are not uncommon. In fact, in a recent data collection, we found a number of individuals with <30° when we strictly controlled for heel lift during the WBLT.

So if <30° of ankle DF ROM is not uncommon, what does a full squat look like when we restrict my ankle DF ROM to 30° during a Back Squat. Figure 5 provides an example of what an athlete may look like with a restriction in ankle DF ROM with the exact same setup position in the back squat as is shown in Figure 2. For obvious reasons, I’ve used a dowel rod here as I didn’t fancy holding the position under load. In this example, the forefoot elevation I’m standing on acts to limit forward rotation of the proximal tibia and imitate an ankle DF ROM restriction. When I attempt to perform a full squat , look what happens to my depth and trunk lean (I promise, I’m doing my best to replicate full depth – check out the face!).

Restricted DF

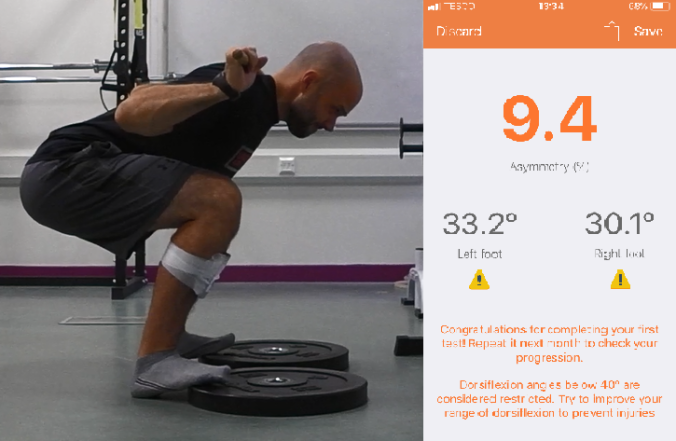
Figure 5. Back squat with artificial restriction to limit ankle dorsiflexion range of motion.

This is not too dissimilar to the athlete in figure 6 who possessed a genuine restriction. This athlete is performing an FMS style Overhead Squat and also possessed an extremely low WBLT score. He also happened to be a national level powerlifter with a back squat well over 2x bodyweight. Clearly his ankle DF ROM restriction showed up in this variation of squat. An important point here is however, that he could still hit parallel with a Low Bar Back Squat during training and competition while maintaining good alignment. As this variation and depth were not restricted by his ankle DF ROM limitation, clearly some variations of squatting can be performed by individuals with reduced ankle mobility.

OH Squat

Figure 6. Bottom position for an athlete with ankle dorsiflexion restriction performing the FMS overhead squat. 

Is the ankle joint always to blame?

Absolutely not. In fact, a lot of the time, I’ve found sufficient ankle DF ROM to be present for an athlete to load some variation of the squat pattern to at least a parallel depth while demonstrating an acceptable technique safe for loading. Furthermore, I’ve seen a number of athletes who had sufficient ankle DF ROM but could only reach a half squat position before taking a few steps backward due to loss of balance. In most cases, this is caused by a lack of skill and poor balance in the squat pattern that prevents their full ROM from being displayed. The first time I read about this concept was a few years back in the UKSCA’s Professional Strength and Conditioning Journal in an article titled Squatting is a balance skill: An alternative technical model (4). This article helped to develop the way I viewed movement faults and I highly recommend the read.

Furthermore, restrictions or structural abnormalities at both the knee and hip joints can also create problems in achieving full squat depth. This is illustrated with evidence that individuals with femoroacetabular impingement are unable to squat to the same depth as individuals without hip bone deformity (5).

And this raises another point that builds a lot of individual variation into this equation. What if an ankle restriction is present in someone with a structural restriction at the hip joint? Or someone has poor ankle DF ROM combined with anthropometric dimensions that already require a large trunk lean (i.e. long femurs and short torso)? Or an anteverted hip joint with a concomitant restriction in ankle DF ROM?

This is why absolute statements about what limits or does not limit squat depth are likely unhelpful. Rather, a number of causes can be present that impact the ability to perform a full squat while maintaining acceptable form.

Conclusion
Hopefully this post provides a balanced perspective on what can limit an individual’s ability to perform a full squat. I definitely don’t want to make out that all technical faults in the squat are caused by restrictions in ankle DF ROM, just that they can be caused by mobility deficits.

References
1. Hemmerich, A., Brown, H., Smith, S., Marthandam, S. S. K., & Wyss, U. P. (2006). Hip, knee, and ankle kinematics of high range of motion activities of daily living. Journal of Orthopaedic Research, 24(4), 770-781.
2. Kasuyama, T., Sakamoto, M., & Nakazawa, R. (2009). Ankle joint dorsiflexion measurement using the deep squatting posture. Journal of Physical Therapy Science, 21(2), 195-199.
3. Rabin, A., & Kozol, Z. (2017). Utility of the overhead squat and forward arm squat in screening for limited ankle dorsiflexion. The Journal of Strength and Conditioning Research, 31(5), 1251-1258.
4. Cleather, D. (2012). Squatting is a balance skill: An alternative technical model. Professional Strength and Conditioning Journal, 25, 17-21.
5. Lamontagne, M., Kennedy, M. J., & Beaulé, P. E. (2009). The effect of cam FAI on hip and pelvic motion during maximum squat. Clinical Orthopaedics and Related Research, 467(3), 645-650.

ARE CLUSTER SETS USEFUL FOR INCREASING MUSCLE MASS

INTRODUCTION

Traditional resistance training involves performing a prescribed number of repetitions which a given load in a continuous fashion with very little rest between reps. This leads to the development of tremendous fatigue, as metabolic by-products accumulate in the muscle while energy stores are depleted. The result of this is that the force development capacity of the muscle becomes steadily reduced to the point (if the set is taken this far) where failure occurs as the muscle can no longer overcome the load.

Cluster sets can be used to reduce the onset of fatigue via the insertion of a small intraset rest period that can vary from anywhere between 5-45s (based on the literature that has looked at cluster sets – really this period of rest can be as long as you like but eventually it will become an interest recovery period, although I’m not sure when this point actually occurs). Cluster sets have been shown to result in improvements for the following performance measures during a set:

  • Higher peak force across the working set.
  • Greater peak power output across the working set.
  • Faster velocities being achieved across the working set for each repetition.

This should be no surprise to anyone as prescribing intraset recovery periods results in reduced fatigue being accumulated, as the short recovery periods allow for the buffering of metabolic by-products while energy stores are being simultaneously replenished. This allows the working muscle to maintain its output levels for longer periods of time. To my knowledge at the moment, there aren’t many longitudinal studies documenting the benefits of cluster sets over the traditional performance of sets (although there are some like Oliver et al1), but from a theoretical perspective, this should all sound great for coaches who are trying to develop strength and power in their athletes. But, what about if you are trying to increase an athlete’s muscle mass?

INCREASING MUSCLE MASS WITH CLUSTER SETS

One thing that is becoming abundantly clear in the literature is that load is not a huge factor to consider when prescribing loading schemes to increase muscle mass. A consistent finding that is coming out of various research groups is that 80% 1RM is no more beneficial for increasing muscle hypertrophy than 30% 1RM2,3. The caveat to this statement though is that whatever the load, the set should be taken to (or at least very close to) failure for muscle hypertrophy to occur.

A side note here is I’m sure there is a threshold for loading when trying to increase muscle mass – meaning it may be that loads as low as 10% 1RM are too low to stimulate muscle hypertrophy but 30% 1RM works just fine. Dankel et al.4 suggests that a set to failure with 30% 1RM lasts approximately 90s, which would obviously stress the fast glycolytic system and cause a large metabolic disturbance (which is a primary mechanism for stimulating muscle hypertrophy). From this perspective, it may be less about the load and more about the time under tension for the muscle as the athlete reaches failure.

So going back to the previous point, driving increases in muscle mass is very much about inducing fatigue in order to stimulate a muscle hypertrophy response. Reaching failure, regardless of load (to a point) not only increases the metabolic stress the working muscle is exposed to, but also facilitates the recruitment and stimulation of higher threshold motor units. Therefore, avoiding fatigue may be counterproductive if muscle hypertrophy is the desired outcome. This likely means that cluster sets, while hugely appropriate for strength and power development (theoretically at this point), may in fact impair the stimulus for muscle hypertrophy via reducing the overall fatigue that the muscle experiences5. Therefore, cluster sets may be considered an inferior approach to training when compared with traditional sets for increasing muscle mass.

The counterpoint to this perspective though is that cluster sets allows the athlete to handle higher loads, so instead of performing sets of 6 repetitions with 78% 1RM, an athlete may be able to perform sets of 6 with 82% 1RM with an intraset recovery of 30 seconds every 2nd rep. Not much evidence exists for this approach at present as most studies that have investigated cluster sets have equated the training volumes between the cluster set and traditional set training groups. However, it may be that this approach to performing cluster sets would allow the athlete to perform the prescribed total reps at higher training intensities and therefore, achieve higher levels of fatigue than if a lower intensity were used. The benefit to this is, the athlete will likely increase maximal strength secondary to using higher training intensities. All the while, the athlete experiences similar levels of fatigue as the traditional approach, resulting in the same amount of hypertrophy as long as failure is reached for both protocols.

The only issue here is that, with the insertion of an intraset recovery, the training density is reduced. For example, if a 4×6 set-rep scheme using a 30 second intraset recovery after every 2 repetitions was prescribed, the working set would last 60 seconds longer than a continuous approach. Ten working sets (likely across multiple exercises) using this approach would obviously result in the training session taking 10-minutes longer if all other variables are equal (i.e. interest rest periods, time under tension, etc.). With these 10 minutes, the athlete could have performed more working sets if a continuous approach to performing sets was adopted instead of the cluster set method. In such case, more training volume may lead to greater increases in muscle hypertrophy, signifying the superiority of traditional sets over cluster sets.

However, again, it’s not that simple as a threshold of training volume likely exists where more sets doesn’t necessarily lead to more muscle mass6. So in this instance, as long as the volume threshold is crossed, muscle hypertrophy will be equally stimulated with either approach.

SO WHERE DOES THIS LEAVE US?

I would suggest that the current evidence available indicates that cluster sets is probably no better than prescribing the traditional approach to performing sets for increasing muscle mass. This is likely the case only if muscle mass is the sole objective. In fact, from a logistical perspective, cluster sets may be less useful than the traditional sets, as it takes longer to complete the same number of sets with the addition of intraset recovery periods.

However, athletes are rarely seeking to increase muscle mass with no regard for improving maximal strength. In most cases, they are seeking to increase muscle mass while developing their maximal strength. In such instances, cluster sets may prove valuable as they would allow the athlete to perform sufficient training volume to stimulate muscle hypertrophy, while also using the high loads necessary to increase maximal strength. Charles Poliquin terms this type of approach functional hypertrophy training, where muscle mass increases along with maximal strength. Table 1 provides an example of a training programme that incorporates cluster sets for developing functional hypertrophy.

Table 2

Table 1. Example of how cluster sets may be incorporated into a training programme aimed at increasing functional hypertrophy.


For many (most) athletes, this would seem desirable and may present as a better method than performing traditional sets in the general preparatory phase, as two birds are hit with the same weight training stone. Furthermore, if higher loads are more useful for hypertrophying the fast-twitch fibres (which, to my understanding, the jury is still out on this concept), cluster sets would again present as an optimal strategy for increasing the size of type II fibres via the prescription of higher training intensities. This is especially the case for athletes who want to avoid increasing the size of type I fibres, which has been theorised to result in decreased muscle contraction velocities. This potentially occurs due type I fibres contracting at slower rates than type II fibres and therefore, impairing type II fibres capabilities to shorten the muscle at high velocities, as they create a “dragging” resistance that type II fibres must overcome.

SUMMARY

Cluster sets are extremely useful for increasing the force, velocity and/or power outputs during a working set when compared to the performance of traditional sets. However, there use for increasing muscle mass may be limited, if they reduce the overall fatigue a muscle is exposed to. As cluster sets do allow for higher training loads to be used, it may be that they allow for muscle mass to be increased to the same level as the traditional approach, while concurrently developing maximal strength with the incorporation of higher training loads being lifted

REFERENCES.

  1. Oliver, J.M., Jagim, A.R., Sanchez, A.C., Mardock, M.A., Kelly, K.A., Meredith, H.J., Smith, G.L., Greenwood, M., Parker, J.L., Riechman, S.E. and Fluckey, J.D., 2013. Greater gains in strength and power with intraset rest intervals in hypertrophic training. The Journal of Strength & Conditioning Research, 27(11), pp.3116-3131.
  2. Mitchell, C.J., Churchward-Venne, T.A., West, D.W., Burd, N.A., Breen, L., Baker, S.K. and Phillips, S.M., 2012. Resistance exercise load does not determine training-mediated hypertrophic gains in young men. Journal of applied physiology, 113(1), pp.71-77.
  3. Schoenfeld, B.J., Grgic, J., Ogborn, D. and Krieger, J.W., 2017. Strength and hypertrophy adaptations between low-versus high-load resistance training: A systematic review and meta-analysis. continuum, 19(20), p.21.
  4. Dankel, S.J., Jessee, M.B., Mattocks, K.T., Mouser, J.G., Counts, B.R., Buckner, S.L. and Loenneke, J.P., 2017. Training to Fatigue: The Answer for Standardization When Assessing Muscle Hypertrophy?. Sports Medicine, 47(6), pp.1021-1027.
  5. Joy, J.M., Oliver, J.M., McCleary, S.A., Lowery, R.P. and Wilson, J.M. Power output and electromyography activity of the back squat exercise with cluster sets. J Sports Sci, 1:37–45. 2013.
  6. Amirthalingam, T., Mavros, Y., Wilson, G.C., Clarke, J.L., Mitchell, L. and Hackett, D.A., 2016. Effects of a Modified German Volume Training Program on Muscular Hypertrophy and Strength. Journal of strength and conditioning research.

EXAMPLES OF IMPLEMENTING A CONSTRAINTS-BASED APPROACH FOR IDENTIFYING MOVEMENT FAULTS

INTRODUCTION

Recently, Emily Cushion and I published “A problem-solving process to identify the origins of poor movement” in the UKSCA’s June addition of Professional Strength and Conditioning Journal. You can read the full text of this paper here:

https://www.researchgate.net/publication/318310420_A_problem-solving_process_to_identify_the_origins_of_poor_movement

The premise of this paper was to introduce a theoretical model for problem-solving the causes of a technical fault in any specific movement, with a clear thought process that allows coaches to break the movement pattern down into its fundamental components. In order to do this, we argue that it is important to try and keep the athlete in the specific movement pattern where the fault(s) are observed. This is different to other screening systems such as the SFMA (which I think is an excellent tool), where a movement fault can only be identified in a handful of tests, followed immediately by employing isolated tests for specific structures. To read more about the rationale for this model, check out the paper using the link above.

The main advantage with this model from other screening tools is that this process is adaptable to any movement. If a coach only uses the SFMA to problem solve movement issues, what happens if a movement fault is identified in the athletes running pattern? What if the athlete has poor landing mechanics during jumping tasks? What if the athlete demonstrates movement faults during a split jerk? How can I as a coach use the SFMA, with its small number of low load screens, to identify the primary driver for these patterns? This isn’t an attack on the SFMA – I just don’t think that it was designed as a tool for this purpose. Note: the only reason I’m even mentioning the SFMA is that this has been a criticism of our model – that coaches should just use the SFMA for identifying the cause of any movement issue in any pattern.

As movement faults are pattern1 and load specific2, we suggest coaches should investigate the specific pattern where the movement fault exists by manipulating the constraints and interpreting any changes in the movement strategy within the pattern. Watch an athlete perform movements that are relevant to their sport or training (i.e. weight room work) and when potentially problematic faults arise, manipulate the constraints to identify how the athlete chooses to self-regulate. In this sense, I don’t see our constraints-based model as a screening tool – it’s really more of a coaching tool that could potentially direct the training process.

This process will show an athletes movement biases and what strategies they do or do not have access to. Then use isolated tests to determine what deficiencies are present in their profile and fill the gaps with the appropriate training modalities. By adopting this strategy and using the model in figure 1, coaches can identify the primary cause of the movement fault as it relates to the meaningful movement task. This is one of reasons why I think this model is useful… it can be employed for ANY movement task.

Figure 1

Figure 1. Screening process for identifying the primary cause of a compensatory movement strategy.

In the PSCJ paper, we used the squat to illustrate the practical application of this model. We did this because it is a relatively simple movement to demonstrate how the constraints-based approach may be used to identify movement faults. For this blog post, I thought I would expand on this and show how the model could be used for a few different movements with some practical examples. Hopefully this will achieve the following:

  • Demonstrate the simplicity of the model.
  • Show the adaptability of the model.
  • Illustrate that for many coaches, they already use a similar strategy.

EXAMPLE 1: EXCESSIVE LUMBAR EXTENSION DURING THE OVERHEAD PRESS

PROBLEM: During the overhead press, an athlete drastically hyperextends the lumbar region of their spine at the final phase of the concentric portion of the lift. This has the potential to place excessive load on the posterior structures of the spine (i.e. facet joints).

CONSTRAINTS-BASED MANIPULATINON OF THE TASK: Have the athlete perform the overhead press whilst maintaining a posterior tilt of the pelvis that in turn, prevents lumbar extension. This can be done by having the athlete sit on the floor while they perform the overhead press (this might require the load to be adjusted for safety purposes).

FINDINGS INDICATE: If the athlete significantly reduces their ROM, the issue is likely driven by the axiohumeral muscles. My first guess (and that’s all it can be at this stage) would be tightness of the latissimus dorsi muscle as it extends the lumbar spine and anteriorly rotates the pelvis. Therefore, posterior rotation of the pelvis (which cause the lumbar spine to flex) would lengthen the latissimus dorsi leading to reduced shoulder elevation ROM. Other regions that may lack of mobility are:

  • Poor thoracic spine extension.
  • Limited flexibility in the sternal portion of the pectoralis major as flexing the lumbar spine (by sitting on the ground) pulls the rib cage down and therefore, lengthens the fibres that attach to the costal cartilage.

These could actually be identified by watching the movement carefully. If the thoracic spine doesn’t extend, it may be a contributing factor. If the infrasternal angle increases and an anterior rib flare occurs, the lower fibres of the pectoralis major might be causing the lumbar spine extension strategy.

ISOLATED TESTS: The following isolated tests would be used to confirm the hypothesis:

  • Latissimus dorsi muscle length assessment.
  • Occiput-to-wall test.
  • Sternal fibers of pectoralis major muscle length assessment.

Check out this paper I wrote for SCJ to learn how to perform these tests:

https://www.researchgate.net/publication/282178464_Shoulder_Function_During_Overhead_Lifting_Tasks_Implications_for_Screening_Athletes

EXAMPLE 2: BARBELL ROTATES DURING THE OVERHEAD PRESS

PROBLEM: When an athlete presses overhead, at the top of the movement the barbell rotates in the transverse plane but the athlete’s thorax remains facing forward (this is surprisingly common in my experience). This has the potential to improperly load the shoulder complex, as well as potentially loading the spine inappropriately.

CONSTRAINTS-BASED MANIPULATINON OF THE TASK: Same as above – overhead press in a seated position. If this makes the rotation worse, it is likely the latissimus dorsi again.

However, as I stated in the original paper, asymmetrical strategies tend to be driven by asymmetries in the pattern. In this case, artificially imparting more asymmetry in the system may make the strategy either more symmetrical or asymmetrical, which in turn would inform the coach of the primary driver.

For this example, have the athlete sit one ischial tuberosity (one buttock) on a small block (depending on the size of the athlete, an Eleiko 10kg plate works perfect). This puts the spine into a position of lateral flexion. So, if the right side of the pelvis is elevated relative to the left (right buttock is sitting on the 10kg plate), the lumbar spine is laterally flexed to the right. This lengthens the left lat relative to the right (try it – it definitely does!).

FINDINGS INDICATE: In this instance, if the rotation becomes exaggerated when performing the press seated on the floor, the lats are implicated. If no change occurs, then investigating other regions is required (i.e. thoracic spine, posterior scapulohumeral musculature, sternal fibres of pectoralis major, etc.).

If, when elevating the right side of pelvis, the barbell rotation worsens, the left latissimus dorsi is likely the issue as it is “pre-stretched” with the right lateral spine flexion. If the barbell rotation disappears (or reduces) with right pelvic elevation, then the right latissimus dorsi is likely tight as it is pre-shortened (relative to neutral pelvic position) with the right lateral spine flexion. This can be confirmed by elevating the left side of pelvis and retesting where the reverse finding would likely occur.

ISOLATED TESTS: The following isolated tests would be used to confirm the hypothesis:

  • Latissimus dorsi muscle length assessment.
  • Sternal fibers of pectoralis major muscle length assessment to rule out other contributing factors.

EXAMPLE 3: KNEE VALGUS DURING THE INITIATION OF A COUNTERMOVEMENT JUMP

PROBLEM: As the athlete initiates the downward phase of a countermovement jump (CMJ), their knees move into a functional valgus bilaterally. However, they correct the position as they begin to ascend during the jump. This may place strain on a number of structures around the patellofemoral and tibiofemoral joints.

CONSTRAINTS-BASED MANIPULATINON OF THE TASK: Have the athlete perform the CMJ with a small mini band around the knees.

FINDINGS INDICATE: During the initial decent of a CMJ, the force demands are below the amount required to maintain a standing position. In figure 2, I’ve shown a CMJ force profile. The red circled section represents the initial decent phase where force demands are very low. As it is at this point where the athlete demonstrates a knee valgus, we know that it can’t be due to a lack of strength as the force demands are minimal.

CMJ

Figure 2. Countermovement jump force profile for an international gymnast. The circled section represents the initial descent phase of the movement.

Instead, it is likely an issue with pre-tensioning the gluteal musculature in the pattern. By adding the mini band, we increase the pre-tension in the gluteals prior to the descent. If the knee valgus strategy disappears or reduces, we know that it is a synchronisation issue with recruiting the lower extremity stabilisers.

If no change occurs in the pattern, other manipulations should be looked at. Another example may be to have the athlete perform the CMJ on a declined surface (such as a small hill with the athlete facing the bottom of the hill) to reduce the demands for ankle dorsiflexion ROM by elevating the heels relative to the forefoot. Note: I don’t recommend doing this with a block for a heel elevation due to safety issues when landing from the CMJ.

ISOLATED TESTS: The following isolated tests would be used to confirm the hypothesis:

  • Hip abduction strength tests to rule out a strength issue.
  • Weight-bearing lunge test to rule out a mobility issue at the ankles.
  • Structural or alignment based tests to rule out other possible factors such as a forefoot varus.

EXAMPLE 4: POOR PELVIC STABILITY DURING RUNNING

PROBLEM: During the stance phase of running, the athlete demonstrates a large contralateral pelvic drop. This may place large stress on the lateral components of the tibiofemoral joint (via the increased knee varus moment)3 as well as some of the lumbopelvic structures due to the excessive motion in the frontal plane.

CONSTRAINTS-BASED MANIPULATINON OF THE TASK: Manipulate the athletes stride frequency. Start with a small increase in the stride frequency (5-10 steps per minute as an example) with a standard speed on a treadmill using a metronome for the athlete follow. This can be done whilst monitoring the athlete’s mechanics (i.e. tibial angle at touchdown) and heart rate (to determine the metabolic efficiency of the athlete with the adjusted stride pattern).

FINDINGS INDICATE: One potential factor here may be the stride length the athlete chooses to use during running. If the athlete uses a high stride length: frequency ratio, the result will be they have to cope with higher impact forces. If these forces surpass the capacity of the frontal lumbopelvic and hip stabilisers, then a contralateral pelvic drop may occur.

So if the higher stride frequency reduces the contralateral pelvic drop, the athlete’s movement strategy for running is the primary driver in this instance. If not, other manipulations should be used (see the next example).

ISOLATED TESTS: The following isolated tests would be used to confirm the hypothesis:

  • Hip abduction and lateral trunk strength tests.
  • Structural or alignment based tests to rule out other possible factors such as a forefoot varus.

EXAMPLE 5: EXCESSIVE PRONATION DURING RUNNING

PROBLEM: During the early portion of the stance phase during running, the athlete appears to excessively pronate at the foot complex causing a knee valgus more proximally. This has the potentially to aberrantly load numerous structures such as the Achilles and Patella tendon.

CONSTRAINTS-BASED MANIPULATINON OF THE TASK: This could easily be linked with a similar issue as in example 4. Manipulating the stride length: frequency ratio is one strategy that could be used to see if the high impact forces associated with long stride lengths are the driver.

Another strategy would be to have the athlete run on a track (could be done on a treadmill but you’d have to draw a line down the centre of the treadmill belt), focussing on their foot contacts being outside of a lane line. This would result in a widening of the stance relative to the location of the centre of mass (COM).

FINDINGS INDICATE: A possible cause for uncontrolled pronation during running is a cross-over gait.4 By having the athlete run either side of the lane line on a 400-m track, they are forced to engage their lateral pelvic stabilisers (gluteus medius, QLO, abdomals, etc.) and control the position of the COM relative to the stance foot.

If this constraint improves the athletes running pattern, then the synchronisation and recruitment of these key frontal and transverse plane stabilisers is the issue (or they do not possess the endurance to maintain control – this could be established by having the athlete perform the manipulation for a prolonged time period). If the pronation becomes exaggerated with stepping either side of the lane (i.e. a wider stance), excessive side-to-side shifting of the pelvis begins to occur, or a large contralateral pelvic drop appears, then the frontal plane stabilising muscles may lack the strength to control pelvic and lower extremity position during running.

To see this in action, check out this video (not sure about the intro music but these guys put out quality material):

https://www.youtube.com/watch?v=LG-xLi2m5Rc

ISOLATED TESTS: The following isolated tests could be used to confirm the hypothesis:

  • Hip abduction and lateral trunk strength tests.
  • Structural or alignment based tests to rule out other possible factors such as a forefoot varus.

CONCLUSION

With this post, I wanted to demonstrate the variety of ways this model could be applied for identifying movement issues in relevant patterns. We published the PSCJ article with the goal of stimulating the S&C coaches thinking for how the manipulation of constraints can inform us as to the movement profile the athlete presents with. This post has hopefully continued this and shown how simple it is to manipulate the constraints for a variety of movements.

REFERENCES

  1. Dill KE, Begalle RL, Frank BS, Zinder SM, and Padua DA. Altered knee and ankle kinematics during squatting in those with limited weightbearing- lunge ankle-dorsiflexion range of motion. J Athl Train, 49: 723-732. 2014.
  2. Frost DM, Beach TAC, Callaghan JP, and McGill SM. The influence of load and speed on individuals’ movement behavior. J Strength Condit Res, 29: 2417-2425. 2015.
  3. Takacs, J. and Hunt, M.A., 2012. The effect of contralateral pelvic drop and trunk lean on frontal plane knee biomechanics during single limb standing. Journal of biomechanics, 45(16), pp.2791-2796.
  4. Pohl, M.B., Messenger, N. and Buckley, J.G., 2006. Changes in foot and lower limb coupling due to systematic variations in step width. Clinical Biomechanics, 21(2), pp.175-183.

5 THINGS ATHLETES SHOULD DO FOR INJURY-FREE SHOULDERS

INTRODUCTION

Injuries happen on the sports field and while we can potentially reduce the risk, they will always occur. However, the number one priority for all S&C coaches in my opinion is to ensure their athletes do not get injured in the weight room. Injuring athletes with general training (i.e. resistance training) is something we have a huge control over and therefore, we are in a position to significantly prevent.

Seeing as the shoulder complex is one of the most injured regions with resistance training1, there are a number of things we can do to ensure our athletes stay healthy in the gym. Here are 5 things coaches should ensure their athletes do that I believe have the potential to significantly reduce injury risk at the shoulder complex for athletes.

  1. Make sure an athlete can pass the Bilateral Shoulder Elevation Test

I value bilateral shoulder elevation test (BSET) massively as a basic screen in order to understand how an athlete moves at the shoulder and spine. In fact, I wrote a whole article about it for SCJ.2

If an athlete can’t get their arms above their head without using compensations, they have no business doing overhead lifting. This is not only applicable for pressing movements. If an athlete can’t get their hands above their head, what do you think the bottom position of their chin up will look like? The likelihood is there will be significant stress placed on a number of structures to make up for the loss of motion. And under high loads (such as what is seen in the chin up) this could be seriously problematic.

This may even result in excessive loading being placed on structures far from the shoulders. If an athlete lacks shoulder elevation and they need to get their hands above their head to finish their Press, it’s not uncommon to see them go straight to a spinal extension pattern to get the rep. Do this enough times and it could cause problems in the future.

So making sure the athlete can get into good positions before you load these patterns will go a long way in ensuring they preserve the health of not only their shoulder complex, but also the neighbouring segments such as the lumbar spine.

Figure 1 shows how to perform the BSET. The findings can be interpreted using the model in Figure 2.

Figure 1

Figure 1. The BSET is performed with the athlete reaching above their head with extended elbows. The arms should move in the scapula plane and at the top position, the coach should determine if the athlete has used the thoracic spine, scapulothoracic articulation and glenohumeral joint sufficiently to achieve this position.

  1. Chase mobility… If the athlete doesn’t already have it

Because the scapula and therefore the humerus reside on the thoracic spine, I always teach students that the thoracic spine is like the foundation for the house to be built upon (the house being the scapula and the humerus in this analogy). Wherever the thoracic spine goes, the scapula goes and that directly impacts what happens at the glenohumeral joint.

A mobile thoracic spine is crucial in order to get the scapula into a good place. Extending the thoracic spine facilitates upward and posterior rotation of the scapula. These movements are important for shoulder health as they move the acromion further from the humeral head, decompressing the subacromial tissue. So from this standpoint, poor thoracic spine mobility may be associated with the onset of external shoulder impingement in athletes who lift above head. You can read more about this in a previous blog post I have on here.

This is exactly the same for the scapula downward rotators. The pectoralis minor, levator scapulae and rhomboids will prevent the scapula from achieving the 50-60˚ of upwards rotation it likely needs to in order to support glenohumeral function.

And it is no different with the muscles that limit glenohumeral joint elevation. A tight pectoralis major, latissimus dorsi or teres major will all cause a failed BSET.

Importantly, once the BSET has been performed by an athlete, the coach can use the findings to get some idea as to what muscles/joints might be limiting the movement. Likewise, the BSET can be used to identify what muscles aren’t functioning optimally in elevating the shoulder (see Figure 2).

Figure X

Figure 2. Process for identifying a potential restriction during the BSET. ST = Scapulothoracic, GH = Glenohumeral

These findings can be confirmed through isolated testing. My article Shoulder Function During Overhead Lifting Tasks: Implications for Screening Athletes in the NSCA’s SCJ shows all the relevant tests that may be employed by the S&C coach to identify mobility restrictions. This article can be found here:

https://www.nsca.com/education/articles/shoulder-function-during-overhead-lifts/

So if the athlete doesn’t have sufficient mobility, then get the mobilisations/stretches in the programme. When deciding how to prescribe mobility/flexibility work, have the athlete do the isolated test for a baseline score, then implement an intervention (as shown in Figure X) and see if it changes their baseline. If it doesn’t, try something else.

  1. Train the scapula upward rotators

The scapula upward rotators are hugely important for the health of the glenohumeral joint. I’ve already spoken about why scapula upwards rotation is important for preventing external impingement, but upwards rotation is also important for maintaining the length-tension relationship of the rotator cuff muscles. A scapula that doesn’t sufficiently upwardly rotate usually results in a larger amplitude of movement at the glenohumeral joint leading to greater lengthening of some of the cuff muscles, causing a reduced overlap of its actin and myosin filaments.

The muscles that upwardly rotate the scapula are the trapezius (predominantly the upper and lower fibres) and the serratus anterior. Each one of these muscles are tremendously important for the function of the shoulder and should be trained in most athletes. Here are a few example exercises to strengthen these muscles.

  • Upper trapezius: Snatch grip shrugs and overhead shrugs – basically shrugging with shoulder abducted beyond 30˚ as this is required for the upper trap to elevate the scapula.
  • Lower trapezius: Prone V’s and band W’s.
  • Serratus anterior: Any crawling movement done in prone and loaded push ups (ensuring scapula protraction at the top).
  1. Train the rotator cuff muscles

This has been a controversial topic in the past, with some practitioners suggesting that isolated rotator cuff training is useless and doesn’t reduce injury risk. I don’t buy that at all as there is some good evidence to suggest that weak external rotators increases the risk of incurring a shoulder injury.3

Facilitating a muscle imbalance through poor programming is a great way to disrupt the arthrokinematics of a joint and degrade tissue. When we consider the functional role of the rotator cuff muscles is to centrate the Glenohumeral joint, it’s not hard to see that if they are weak relative to the pectoralis major (as an example), shoulder health may become compromised. Therefore, if your athlete can BB bench press 165kg for 1 rep but can only do a side lying DB external rotation with 4kg for 10, it is unlikely to work out well for the athlete in the long run.

In my own practice as a coach, I use the athlete’s bench press to guide where their rotator cuff strength should be. As the bench press involves a high level of strength from the pectoralis major, anterior deltoid and latissimus dorsi, comparing this lift to rotator cuff strength can inform the coach as to the relative strength of the athlete’s stabilisers. I like to see athletes be able to do rotator cuff work with approximately 8-10% of their 1RM Bench Press for 8-10 reps. So if a guy has a 120kg Bench, I think he should be able to do side lying DB external rotations with approximately 9-12kg dumbbell for 8-10 reps. I use the approach with some of the scapula work I spoke about previously.

I’ll be the first one to say that I’m not aware of much research to support this ratio. I also think a number of variables play into the level of appropriateness of this ratio. As an example, if a powerlifter can Bench Press 250kg, do I think they should be able to do rotator cuff work for reps with a 25kg dumbbell? Probably not. But if that athlete can only do 4kg for 8 reps, I think it may be a problem.

Although I appreciate there are holes in this concept, I believe it’s built on a robust theoretic model. It’s something I have used a lot with good success in the athletes I’ve worked with. At the very least, this concept can be used with athletes to motivate them to strengthen some key shoulder stabiliser muscles.

  1. Monitor ALL overhead lifting

This is a trap I’ve fallen into before with athletes. I’ll calculate the exposure to traditional overhead lifting (e.g. chin ups, press, snatch, etc.), but won’t factor in exercises such as abs rollout. Even stuff like wall angels. Then, all of a sudden, my athletes are doing tons of high load overhead work that I’m not considering as volume that may be problematic (note: a wall angel can be high load if you aren’t very mobile. In order to overcome the stiffness of the tight muscles, high level contractions of the shoulder musculature are needed, therefore exposing the shoulder complex to high loads).

This is a major issue as exposure is primary risk factor for virtually all injuries (if you never run, you’re unlikely to tear the long head of the biceps femoris). In this sense, if we don’t manage exposure, then we aren’t controlling a primary risk factor to shoulder injuries.

I would also add other exercises that directly loads the glenohumeral joint into this calculation. If you prescribe upright rows, you should consider the volume allocated to this exercise. Same with lat raises. In fact, any exercises performed with the shoulder elevated above the 60˚ associated with the painful arc is of interest.

Once you know the volume that the shoulder complex is being exposed to, you can programme accordingly to ensure huge spikes in overhead lifting volume don’t occur in the weight room.

SUMMARY

Hopefully this post has given some coaches some ideas for programming for the shoulder complex. For the most part, each variable discussed is relatively obvious, but its surprising how many times these things fall out of an athletes programme.

REFERENCES

  1. Kolber, M.J., Beekhuizen, K.S., Cheng, M.S.S. and Hellman, M.A., 2010. Shoulder injuries attributed to resistance training: a brief review. The Journal of Strength & Conditioning Research, 24(6), pp.1696-1704.
  2. Howe, L.P. and Blagrove, R.C., 2015. Shoulder Function During Overhead Lifting Tasks: Implications for Screening Athletes. Strength & Conditioning Journal, 37(5), pp.84-96.
  3. Clarsen, B., Bahr, R., Andersson, S.H., Munk, R. and Myklebust, G., 2014. Reduced glenohumeral rotation, external rotation weakness and scapular dyskinesis are risk factors for shoulder injuries among elite male handball players: a prospective cohort study. British journal of sports medicine, pp.bjsports-2014.

TRAINING ATHLETES WITH FEMORAL ACETABULAR IMPINGEMENT IN THE WEIGHT ROOM

INTRODUCTION

At this point in time, it’s pretty clear that our ability to predict injury using traditional screening tools is rubbish. This is especially the case when we use screens that have little resemblance of sports skills that are relevant to the athlete. Here is a recent meta-analysis that demonstrates the point I’m making.

So if general screens don’t predict injury, are they useless? I don’t believe so. Understanding how an athlete presents before participating in a strength and conditioning (S&C) programme is really the primary reason for screening athletes from our perspective. If we can appreciate how they are put together and how they organise themselves during movements, we can potentially identify exercises that are at that point in time, contraindicated.

Identifying structural maladaptation’s or pathology are some of the variables that may contraindicate an athlete for certain exercises. If there were field-based screens (and there aren’t) that could identify type III acromion’s, then maybe we could be a little bit more accurate in individualizing the dosages for overhead movements in preserving rotator cuff health.

One structural abnormality that should be considered by S&C coaches in the prescription of lower extremity exercises is femoral acetabular impingement (FAI). Throwing athletes with FAI into a weight room programme that loads the hips, may have the potential to increase injury risk. As such, this post will discuss ways to identify athletes with FAI along with strategies for manipulating key variables in the resistance training programmes for athletes with FAI.

FEMORAL ACETABULAR IMPINGEMENT

Femoral acetabular impingement is the term used to describe the bony overgrowth seen at the hip joint. This structural abnormality may occur at either the femoral neck-head junction (called a CAM) or the anterior-superior aspect of the acetabulum (called a PINCER). There is a third type whereby the athletes present with both types of bony overgrowth (called a mixed CAM-PINCER). Figure 1 shows a CAM and PINCER.

FAI

Figure 1. Image A shows the CAM deformity, whereas B shows a PINCER deformity.

This structural pathology may cause impingement of tissues surrounding the hip joint, such as the acetabular labrum. This occurs during end ROM hip flexion, internal rotation, adduction, or a combination of these movements.

Femoral acetabular impingement is particularly prevalent in athlete populations and is extremely common in sports with a high exposure to changes of direction during running (such as American Football and Football). This can present as major issue for athletes in these sports, as FAI is a pathology associated with groin pain. In fact, patients with long standing groin pain have a high prevalence of FAI. Furthermore, many individuals with FAI are asymptomatic and therefore, may have an issue bubbling under the surface. Exposing these athletes to exercises loading the hip joint in flexion, internal rotation or adduction may be all that is needed into changing their status from healthy to injured.

It should be recognised that impingement at the hip joint is not only due to bony abnormalities. Repetitive exposure to end ROM hip flexion, adduction or internal rotation may also cause impingement without a structural pathology being present. Likewise, poor joint alignment during squatting type exercises (i.e. excessive knee valgus) may also cause symptoms of FAI. In fact, I published a case study here in PSCJ of an athlete with poor squat mechanics who presented with symptoms of FAI.

IDENTIFYING ATHLETES WITH FAI

This subheading is misleading, as it is not the S&C coach’s role to diagnose athletes with FAI. However, if some generic screening has the ability to find an athlete who may have FAI before loading their hips up in the weight room, it might be possible to catch them in the net before causing problems. Here are three ways to identify an athlete that may have FAI:

  1. Although squats are not a good test for diagnosing FAI, athletes who demonstrate limited hip flexion ROM during the descent, report pain or a “pinching” sensation in the anterior aspect of the hip joint should considered for referral to a medical practitioner.
  2. Femoral acetabular impingement is aggravated in athletes with end ROM hip flexion, internal rotation or adduction. When an athlete presents with either limited ROM or pain on any of these movements during passive screening, they should be considered for referral.
  3. Combinations of hip flexion, adduction and internal rotation are extremely problematic for athletes with FAI. As such, this is one of the ways a clinical impression (diagnosis is achieved through X-Ray) may be developed for FAI. Pain on the provocative FADIR test is a positive sign that an athlete may have FAI (here is a nice video on how this test is performed).

At this point, if the S&C coach believes an athlete is suffering from FAI, immediate referral to a medical practitioner is recommended.

TRAINING AROUND FAI IN THE WEIGHT ROOM

In terms of correcting FAI, surgery may be recommended by the medical practitioner if a bony pathology exists. If the athlete is not going to have surgery to remove the excess bone, or no bony pathology has been identified yet symptoms are present, the S&C coach should consider making some fundamental modifications to programming and exercise performance. Here are a few suggestions:

Be cautious with applying textbook technical models

The typical technical models that get spouted out for lower body exercises are mostly appropriate. However, we have to allow the athlete to move in ways that fit their morphology.

Squatting bilaterally with the feet straight ahead or positioned 5-to-1 on a clock face at shoulder width won’t necessarily fit every athlete. In order to prevent impingement in athletes with FIA, squatting with some additional hip external rotation and/or abduction through toeing-out or widening the stance respectively, may be beneficial as it allows them to go into hip flexion without combining provocative movements (i.e. flexion + internal rotation).

This is less of an issue for exercises such as RDL’s that do not get to end ROM at the hip joint.

 Careful with single-leg squatting

The whole single-leg vs. double-leg training is plain stupid in my opinion. For the most part, when selecting exercises, it’s about finding movements that work for the athlete in front of you and then progressively overloading that exercise. Whether it’s single-leg or double leg squatting will have no impact on athletic performance if those movements are general in nature.

That said, I would argue that single-leg squatting in athletes with FAI doesn’t work as well as bilateral squatting in my experience (everything else being equal). The issue is that with double-leg squats, the athlete can move into hip flexion with concurrent hip abduction and external rotation.

However, with single-leg squats, this just isn’t the case. The hip flexion in single-leg squatting comes with more relative hip adduction and internal rotation (comparatively). See Figure 2 for an example.

DL vs SL
Figure 2. Note the change in hip position in the frontal and transverse plane between double- and single-leg squatting.

Cut the ROM short

This will likely irritate some purists who think every squat in the weight room should be arse-to-grass. While full ROM is great if the athlete can do it without issues, athletes with FAI won’t do well with tons of loaded hip flexion to end ROM. Cutting the ROM even an inch or two short may prevent impingement and help the athlete out in the long run. This means exercises such as front foot elevated split squats and snatch grip deadlifts from a deficit doesn’t make the cut in the programming for an athlete with FAI.

And I challenge anyone to show me evidence that squatting a few inches from full ROM has a significant negative impact on athletic performance. On the other hand, it’s not difficult to find evidence to suggest injury ruins athletic performance and can be costly in the long run.

So if you do choose to use single-leg exercises for the benefits they offer, shortening the ROM may be important to prevent impingement at the hip.

Avoid stretching into hip flexion, adduction and internal rotation

This is obvious but worth saying – stretching in positions of pain provocation is for most part, inappropriate. This is similar to the sleeper stretch that replicates the Hawkins and Kennedy test. In individuals with shoulder impingement, this will only make their symptoms worse.

Sort foot alignment out

The function of the hip is heavily reliant on the function of the foot complex during closed chain movements. When squatting (both DL and SL), if the foot pronates, it will drive the hip to internally rotate. This occurs due to joint coupling in the lower extremity and can be read about here.

So when squatting, if the athlete pronates at the foot (causing internal rotation at the tibia and femur) then the end range hip flexion will likely be combined with internal rotation at the hip, which is the provocative position for FAI.

As these positions should be avoided in the weight room, ensuring an athlete maintains subtalar joint neutral is vital for a healthy hip joint. Figure 3 shows the difference in lower extremity alignment at the bottom of the squat when pronating the foot vs. keeping the foot in a position of relative neutral.

Pro vs Neutral

Figure 3. Squatting with a pronated foot position versus a neutral alignment at the subtalar joint. Note the difference in hip joint position.

Ensure sufficient ankle dorsiflexion ROM is present

Poor ankle ROM during squatting type movements have been shown to increase pronation at the foot in order to allow the tibia to continue to its forward rotation. As such, this ties into the point above, with pronation causing increases in hip internal rotation.

Also, athletes who squat with poor ankle dorsiflexion ROM also tend to increase the amount of hip flexion ROM they move through. His is shown in the athlete in Figure 4 during an overhead squat. This athlete possessed very little ankle dorsiflexion ROM and as such, moved through excessive hip flexion early in the ROM.

This is obviously problematic as now the athlete with FAI is heavily relying on full ROM hip flexion to lower their centre of mass whilst potentially moving into hip internal rotation in order to accommodate pronation at the foot.

OH Squat

Figure 4. The bottom position for an athlete performing the overhead squat with limited ankle dorsiflexion ROM.

Correct pelvic alignment

This is especially important during exercises that require hip flexion. If an athlete holds their pelvis in a position of excessive anterior tilt, this will reduce their capacity to flex the hip during squatting type exercise, as the hip will bang into the rim of the acetabulum earlier in the movement. This may also exhaust their end ROM in the other planes. For example, if an athlete excessively anteriorly tilts the pelvis, their capacity to internally rotate the hip joint may be limited meaning they find end range sooner potentially exacerbating symptoms due to the faulty pelvis position.

SUMMARY

Femoral acetabular impingement is common in many athlete populations. As such, it is important S&C coaches can screen an athlete to ensure the exercises they prescribe are appropriate. Athletes should be referred for medical screening if they report pain or “pinching” in the hip during squatting type exercises, have limited ROM in hip flexion, internal rotation and/or adduction or have a positive FADIR test. If an athlete is diagnosed with FAI, the modification to exercises suggested in this post will help prevent exacerbation of symptoms while providing the athlete with a training stimulus to improve athletic performance.

USING MOVEMENT QUALITY RATIOS TO DIRECT THE TRAINING FOCUS

INTRODUCTION

For decades, Weightlifting coaches have used lifting ratios to establish where an athlete’s weakness lies. A very basic example of this would be if a weightlifter had a back squat of 230kg, yet could only squat clean 155kg. The coach would be pretty confident that the athlete has enough leg strength to squat clean higher loads, but lacks either the explosive strength or the technical ability in their present state.

Another example may be for the bench press. A coach could compare an athlete’s close and wide grip bench press to establish the maximal strength levels of the synergistic triceps and pectoral muscles. If an athlete could close grip bench press 150kg but with a wide grip, only bench press 140kg, the coach could be pretty confident that the athlete lacks the pectoral strength to bench press greater loads. Therefore, the pectorals would be the focus of the training programme that should, in theory, lead to an increase in the athlete’s bench press strength.

Here are some other examples of how ratios can be used to direct the training focus:

Countermovement: Squat jump: A high CMJ relative to SJ would indicate poor starting strength (or RFD) due to the time constraints of the SJ.

Back squat: Countermovement jump: A high back squat relative to CMJ would indicate high levels of maximal strength relative to explosive strength in the lower extremity.

Back squat: Single leg squat: A high back squat relative to the single leg squat would indicate high levels of maximal strength relative to the “steering” of these forces during single-leg stance.

This same concept can be used for movement quality. Ratios can be used to indicate whether poor movement quality is due to technical issues related to a given skill, or limited mobility/flexibility.

MOVEMENT QUALITY RATIOS

The example I will use here is sprinting but really could be any movement pattern that is relevant to an athlete. During sprinting, limited hip extension can negatively impact the position of the pelvis particularly during the late stance phase, leading to excessive loading of surrounding tissues such as the hamstrings musculature. This is why limited hip extension has been suggested as a risk factor for hamstring injuries during sprinting.

For coaches, some basic videoing and plotting of 2D joint kinematics can help identify if an athlete has the capacity to extend their hip during the late stance phase of sprinting.

In order to identify if this is a mobility issue, the modified Thomas test can be carried out on the athlete (Figure 1). This test can be used to identify if a restriction exists in any of the numerous hip flexor muscles.

IMG_1016

Figure 1. The modified Thomas test is performed with the athlete laying supine on the edge of a plinth. The athlete has the right hip fully flexed with the lumbar spine flattened. The left leg (the tested leg) hangs down and the athlete is encouraged to relax in order for it to be true passive test.


Below is a guide and visual demonstration for interpreting the findings of the modified Thomas test:

Thigh not parallel with the floor = tight psoas major and iliacus

IMG_1017

Knee >90° and not perpendicular to the floor = tight rectus femoris

IMG_1018

Hip abducts and the knee moves away from the midline = tight TFL

IMG_1019

Knee turns out and femur externally rotates = tight sartorius

IMG_1020

A quick side note here – sometimes you can get misleading results with this test. For example, an athlete may have their thigh above parallel with the ground, indicating a tight psoas major and iliacus. However, it could still be rectus femoris causing limited hip extension even if the knee reaches approximately 90° of flexion. In order to identify which muscle is tight, manipulating the position of the knee can inform you as to whom the culprit is. If you extend the athlete’s knee and they can relax into more hip extension, the rectus femoris is likely tight. If the knee extends but they do not move into more hip extension, the psoas major and iliacus is tight. This is due to the biarticular nature of rectus femoris.

INTERPRETING THE RATIO

Once the analysis is complete, we will have a ROM ratio of capacity: utilisation for hip extension (capacity being from the passive ROM test and utilisation being during the specific skill – in this case sprinting). Here are the scenarios that may arise and relevant interpretations:

  1. Poor capacity: Poor utilisation = Mobility focus

If the athlete doesn’t possess the ROM, they won’t have it to use in specific skills. Once hip extension ROM has been achieved, the focus should switch to a technical emphasis in order to teach the athlete to how use their newfound ROM.

  1. Good capacity: Poor utilisation = Technical focus

The athlete has the ROM, but is unable to use it. Therefore, improvements in technique are required and should be the training focus. This should be considered alongside the athlete’s current profile in relevant strength qualities that may impact their ability to use their ROM. 

  1. Good capacity: Good utilisation = Not a factor for consideration

Improvements in sprinting will likely come from greater technical skill (more global) and improving physical qualities that are specific (or relevant) to sprinting.

SUMMARY

Using ratios to direct the training process is not a new concept and has been used for decades. This post has attempted to highlight how with the relevant information, ratios can be used to direct the training process as it relates to movement quality. By identifying mobility capacities relative to the sport skills, coaches can individualise the training process and direct the training focus.

IS YOUR THORACIC SPINE LIMITING YOUR OVERHEAD PRESS?

INTRODUCTION

If there are three areas’ that demand mobility and are problematic for many athletes, it’s the ankle, hip and thoracic spine. Now, this is a massive over simplification and is entirely specific to the demands of the activity the athlete is attempting to perform. However, if the athlete wants to get strong in the weight room, the mobility of at least one of these three joint segments will be a prerequisite for performing the movements in an efficient and safe manner.

Although the thoracic spine plays an important role during lower body exercises such as the deadlift or squat, it is a huge determinant on the performance of upper extremity exercises – particularly if they involve overhead reaching (i.e. Overhead Pressing and Pull Ups). Here are just a few issues (with hyperlinks to the relevant studies) poor thoracic spine alignment can cause as they relate to shoulder movements:

As we can see, thoracic extension is important. If you’re trying to improve your overhead strength, the evidence here would suggest that thoracic spine movement is a major player in supporting performance. This article will therefore suggest a strategy to identify limited thoracic spine mobility, as well as to improve it for Overhead Pressing.

 ASSESSING THORACIC MOBILITY

During overhead lifting tasks, if the thoracic spine is unable to extend to a sufficient degree, then the shoulder complex will likely be impacted in its performance (as discussed above). Barbell Overhead Pressing can require up to 150˚ of shoulder flexion, with dumbbell variations likely demanding more due to the hands being positioned closer together at the end of the ascent phase. Although research has indicated approximately 10˚ of thoracic extension is required during bilateral shoulder elevation, this amount will change depending on the athletes start position. If an athlete begins their Overhead Press in a position of thoracic hyperkyphosis, then they’ll need more extension to get their shoulder complex into a good place. Likewise, if their thoracic spine is already extended, then little to no thoracic spine extension will be needed.

T-spine 6

Figure 1. Bilateral shoulder elevation test (BSET).

In order to test thoracic extension, ask the athlete to perform the bilateral shoulder elevation test (Figure 1). You can measure thoracic extension with this test in two different ways:

  1. You can use hand held inclinometers (Figure 2)
  2. You can eye-ball thoracic spine alignment and decide if it gets to where it needs to at the end of the shoulder elevation.
T-spine

Figure 2. BSET using two inclinometers to measure thoracic extension.

If the athlete fails to achieve 180˚ of shoulder elevation and you establish that the thoracic spine doesn’t extend enough to support the motion, you can test the mobility of the thoracic spine using the Occiput-to-Wall test (Figure 3).

t-spine 2

Figure 3. Occiput-to-wall test.

During the Occiput-to-Wall test, ask the athlete to roll their pelvis posteriorly so their lumbar spine is flat against the wall (moving the feet a foot or two forward helps with this as it takes the slack of the hip flexor musculature). From here, the athlete attempts to touch their head against the wall with their chin tucked in (corner of the eye in line with the superior junction of the auricle). If they can achieve this position, they have pretty good thoracic extension and just don’t know how to use this extension during shoulder elevation. If not, they need to chase mobility with a corrective programme.

This process for screening and improving overhead performance is illustrated in Figure 4.

T-Spine 5

Figure 4. Screening process for the BSET.

INCREASING THORACIC MOBILITY

When selecting mobility exercises, there is one primary principle that I think everyone should adhere to within reason. That is, you need to know if the mobility exercise and technique works. This sounds obvious, but there are so many S&C coaches who don’t follow this general guideline, failing to establish if what they are doing has any benefits for their individual athlete. The only way to do this is to test for mobility, try an intervention, and then re-test mobility. If you don’t see changes, what you did doesn’t work.

This doesn’t mean you need to do a different exercise. It might mean you need to change the dosage, the way they performed the actual movement, or apply a different technique (i.e. go from a static version to a Muscle Energy Technique). But whatever you do, check to see if the athlete’s performance on the test got better. Using this strategy will allow you to individualising the process.

In the context of this example, if I had an athlete with poor thoracic extension, I could have them perform the Occiput-to-Wall test, then perform a thoracic extension mobility exercise, then re-check their Occiput-to-Wall.

When it comes to establishing the prescription of acute variables, I recommend starting with as low a dosage as possible in order to establish what is the least amount the athlete can do but still get results. From here, if you find you can increase thoracic spine extension acutely with the mobility exercise in Figure 5 using 5 reps of 10 seconds hold (as an example), then prescribe that technique. If you find nothing changes after a few adaptations of the approach, switch the exercise or drastically change the technique (e.g. try long sustained holds).

t-spine 4

Figure 5. Bench thoracic spine mobilisation.

The same strategy should be used when it comes to selecting the optimal frequency. Once you know the acute dosages, have the athlete start by doing their mobility exercises three times per day. After 3-5 days, re-test their Occiput-to-Wall. If there is no improvement, up the frequency – especially if you’ve established that the volume is sufficient for a single bout.

Another consideration is specificity. If you want to increase thoracic extension, do thoracic extension exercises. In my own experience, I’ve never seen thoracic rotation exercise increase thoracic extension to the same degree as an extension based exercise.

THE LAST PIECE OF THE PUZZLE

Once mobility has been improved, you need to teach the athlete how to use it. Through my own research, I found that if you just mobilise a joint, you’ll increase ROM but it won’t have any impact on movement quality in multi-joint dynamic tasks. This tells us that increasing thoracic extension won’t necessarily lead to immediate increases Overhead Pressing performance, at least acutely. We need to teach the athlete to use their new found ROM. The approach I suggest to accomplishing this is as follows:

  1. Teach them to use their new found ROM in isolated tasks. This will likely start in unloading positions that look nothing like the Overhead Press. The performance of these movements will unlikely transfer to the Press, but the athlete needs to know what it feels like to extend their thoracic spine. To start with, this will involve an isolated approach where the thoracic spine is the only segment contributing to the movement. From here, bringing the neighbouring segments (i.e. the shoulder complex) into the movements will teach the thoracic spine to function within the chain of joint segments. This can take a few minutes or a few weeks based on the athlete.
  2. Find their success threshold in the specific movement you want to improve. Now they know how to extend their thoracic spine, we need to incorporate this strategy into the Overhead Press. The prescription of acute variables will be dictated by the athlete’s ability to achieve an optimal position of thoracic extension. This means finding a load and rep-set scheme that allows the athlete to successfully incorporate their new movement strategy into their Overhead Press.
  3. Challenge the threshold. This may mean you add load, volume, density or complexity to the movement. Anything that challenges them, whilst maintaining a level of success will lead to progression in the pattern.

SUMMARY

Exercises that include overhead movements demand thoracic extension. Therefore, thoracic spine issues can be a serious problem for athletes in the weight room. When ROM limitations are observed, coaches need to improve thoracic mobility using an evidence-based approach(does what you’re doing work?). From there, integrating the new found motion into the athlete’s overhead movement strategies is not an automatic process. Learning to use the mobilised thoracic spine as part of Overhead Pressing is paramount to being successful in optimising performance. This article has presented a number of tools that will help improve an athlete’s thoracic spine mobility, specifically as it relates to Overhead Pressing.

ANKLE MOBILITY OR SPINE EXTENSOR STRENGTH – WHAT’S MESSING UP YOUR SQUAT?

INTRODUCTION

Strength and Conditioning coaches seem to love looking at things in isolation (obviously generalising here!), as do physio’s (again, a massive generalisation and definitely not always the case). In fact, in my experience, the more a rehab orientated position you come from, the more this is the case when viewing technical faults in lifts like the squat and identifying the cause. It’s understandable, as this is quite an easy approach.

Here are a few examples of what I mean as they relate to the squat exercise:

  • Knee’s cave in (valgus) = weak glutes
  • Pronate at the feet = weak supinators (i.e. TA, TP, FHL, FDL, etc.)
  • Go on to your toes during the descent = lack of ankle mobility
  • Round your back during the descent = weak spinal extensors or lack of thoracic mobility

While each of these can be the case, they definitely aren’t the only driver. In fact, in my opinion they are rarely the cause. The reason I say this is as we view an athlete’s squat from a technical standpoint, we need to appreciate each joint complex relative to the other. From this perspective, we need to understand that what any joint does during the movement will impact the other joints in the system.

This is due to the demand of the task. Using the squat as an example here, the demands of the movement (and nearly all other movements) require us to keep our centre of mass (COM) over our base of support (BOS). If this doesn’t happen, we fall over. During the descent of the squat, if the ankles don’t dorsiflex and the knee and hip joints continue to flex, we fall over (Figure 1B).

Figure 1

Figure 1. The effects of ankle dorsiflexion ROM on the position of the COM relative to the BOS.

This information makes it lots more challenging to identify who is the primary driver (this is a concept that Diane Lee made me aware of – I heavily recommend some of her online material). Therefore, if we see the spine flexing excessively during the squat, it might not be spinal extensor weakness. It also might not be a tight posterior chain.

In the example here, I’ll use this concept to identify how restrictions in ankle dorsiflexion can impact spinal position during the squat, along with how we can identify this cause as a primary driver.

WHERE TO START

Whenever we view a movement, the first thing we need is to understand what the movement should look like. If we don’t know what the movement should look like, how can we know if the movement the athlete shows us is good or not? And by good or not, I mean is it a movement that will allow the athlete to develop physical qualities or expose them to unnecessary risk.

So we need a technical model. There are a ton of places you can get this information from – my starting point is always SCJ or PSCJ as this siv’s through a lot of the misinformation that is available online. An example of misinformation is when coaches tell us people should squat with their feet facing forward. This strategy is not only problematic; it can be dangerous as we fail to consider the individuals anatomical variations.

As it relates to the bottom position of the squat, we know that we should be able to dorsiflex the ankle to approximately 30-40°, flex the knee to approximately 120-130° and flex the hip to about 130-140°. The reason I say approximately is because this is pretty heavily determined by an athlete’s anthropometric profile. Some people may need more ankle motion relative to their hips to break parallel; others may need more hip mobility relative to their ankles.

Importantly, these are the only joints that contribute to us lowering our COM during the descent. This means one thing: if your squat is technically poor, one or more of these joints are the problem. This is always the case unless another segment is moving which shouldn’t be.

IDENTIFYING ISSUES

Once we know what movements should look like, now we can compare our athlete to our “model”. If major discrepancies exist, all we need to do is identify what joint is not doing as it should. So, say for example an athlete leans forward excessively with their trunk in the bottom position, and we look at the hip and they hit >130° of flexion, we look at the knee and they are <120° and the ankle is nowhere near 30°, we can comfortably say the hip is good (in terms of mobility) but the ankle and knee ROM is limited. The next thing for us to do is see whether it’s the ankle, the knee or both that is impacting the squat.

An easy way to do this is to manipulate the task to take the demands away from one of those joints. For example, if you do a pole squat where the athlete doesn’t need a use as much ankle dorsiflexion ROM (due to being able to lean back on the pole), and their knee flexion improves beyond 120°, the knee has the available ROM and the ankle is implicated as the cause for the forward trunk lean. If not, knee flexion ROM is an issue.

Another commonly used method to establish the primary driver is to elevate the heels. If this increases ROM at the knee (by giving the athlete artificial dorsiflexion ROM), ankle dorsiflexion is likely the issue.

The only problem with this thought-process is that it is most times not this simple. For example, an athlete may look like they can get the ankle to dorsiflex to 30° at the bottom of the squat, but they also go into a knee valgus to do this. In this case, the knee valgus is likely being combined with pronation at the foot complex (due to joint coupling). This pronation allows the midtarsal joint to unlock and the tibia to continue moving forward. If this is combined with the feet spinning out into external rotation (a very common strategy), then it may be that the subtalar joint is also helping out by using eversion to keep the tibia moving forward into what appears (but isn’t) to be ankle dorsiflexion. You can read more about this from some of the articles on my reasearchgate.

This is why we have to always consider movements that may be occurring outside of sagittal plane. The frontal and transverse plane compensations can hide the real issue if we don’t look carefully.

SO HOW CAN THE ANKLE DRIVE SPINAL FLEXION DURING THE SQUAT?

If the ankle can’t dorsiflex to the necessary angle during the descent of the squat, this will increase the demands higher up the chain. This is due to the relationship that I previously discussed between the position of the COM and the BOS. Figure 1B shows that during the squat, if an ankle doesn’t dorsiflex and the knee and hip flex as they should, the will move posteriorly relative to the BOS – the end result being the athlete falls over. The athlete’s survival system will obviously not allow this to happen (although with some athletes this does happen – I wish I had £1 for every athlete or student I’ve seen fall or stumble backwards on their first attempt of an overhead squat).

So the athlete will compensate. They’ll do this by using any strategy they have access to. This might be to extend at the shoulder complex if the movement is the overhead squat and the arms are free to “roam” (as in Figure 1C). However, when the arms are constrained during a movement such as the front squat, another segment is required to help out, and there’s no better segment than the thoracic spine for this job due to it’s location.

As the athlete squats down and the ankle’s stop dorsiflexing, the hips run out of ROM to compensate, then the thoracic spine will have to flex excessively which moves the barbell weight and upper torso mass forward. This strategy results in the the COM staying over the BOS.

Now the traditional view would be to look at this and say thoracic hypomobility or lack of thoracic strength issues exist – and it definitely could be the case. But it could also be nothing to do with lack of mobility or strength at the t-spine. Here are 3 ways to check this.

  1. If they can get into a good position with the thoracic spine in the start position, it’s not a lack of mobility – you can pretty much cross that one off your list. If they were stuck in a position of hyperkyphosis, this wouldn’t change in regards to where they are in their squat movement. You can test thoracic mobility with an Occitput-to-Wall test (check out my t-spine paper of researchgate for this test).
  2. Look at other lifts. If they don’t round at the thoracic spine in more hip dominant lifts such as the RDL or good morning, it’s not a lack of spine extension strength. These lifts don’t require ankle mobility but put high force demands on the spinal extensors.
  3. Manipulate the ankle position. A simple one here is to elevate the heels and see if the thoracic spine still flexes during the descent, or flexes later in the movement. If this prevents spinal flexion from occurring, then it is likely an ankle mobility issue. Another little trick I like to test this hypothesis is to go the other way round – elevate the forefoot (1 inch block is all you need here). If this makes the thoracic flexion worse by either making it occur to a higher degree or earlier in the descent phase, then it’s an ankle joint limitation. Bet your house on it. Especially if you can check number 1 and 2 off the list.

SUMMARY

Hopefully I’ve highlighted or at least reinforced with this article an important concept regarding viewing movement as a whole and not in isolation. In later blogs I’ll talk about how we can screen ankle and thoracic mobility, as well as showing some of the things we can do to improve movement quality.