INTRODUCTION
Recently, Emily Cushion and I published “A problem-solving process to identify the origins of poor movement” in the UKSCA’s June addition of Professional Strength and Conditioning Journal. You can read the full text of this paper here:
The premise of this paper was to introduce a theoretical model for problem-solving the causes of a technical fault in any specific movement, with a clear thought process that allows coaches to break the movement pattern down into its fundamental components. In order to do this, we argue that it is important to try and keep the athlete in the specific movement pattern where the fault(s) are observed. This is different to other screening systems such as the SFMA (which I think is an excellent tool), where a movement fault can only be identified in a handful of tests, followed immediately by employing isolated tests for specific structures. To read more about the rationale for this model, check out the paper using the link above.
The main advantage with this model from other screening tools is that this process is adaptable to any movement. If a coach only uses the SFMA to problem solve movement issues, what happens if a movement fault is identified in the athletes running pattern? What if the athlete has poor landing mechanics during jumping tasks? What if the athlete demonstrates movement faults during a split jerk? How can I as a coach use the SFMA, with its small number of low load screens, to identify the primary driver for these patterns? This isn’t an attack on the SFMA – I just don’t think that it was designed as a tool for this purpose. Note: the only reason I’m even mentioning the SFMA is that this has been a criticism of our model – that coaches should just use the SFMA for identifying the cause of any movement issue in any pattern.
As movement faults are pattern1 and load specific2, we suggest coaches should investigate the specific pattern where the movement fault exists by manipulating the constraints and interpreting any changes in the movement strategy within the pattern. Watch an athlete perform movements that are relevant to their sport or training (i.e. weight room work) and when potentially problematic faults arise, manipulate the constraints to identify how the athlete chooses to self-regulate. In this sense, I don’t see our constraints-based model as a screening tool – it’s really more of a coaching tool that could potentially direct the training process.
This process will show an athletes movement biases and what strategies they do or do not have access to. Then use isolated tests to determine what deficiencies are present in their profile and fill the gaps with the appropriate training modalities. By adopting this strategy and using the model in figure 1, coaches can identify the primary cause of the movement fault as it relates to the meaningful movement task. This is one of reasons why I think this model is useful… it can be employed for ANY movement task.
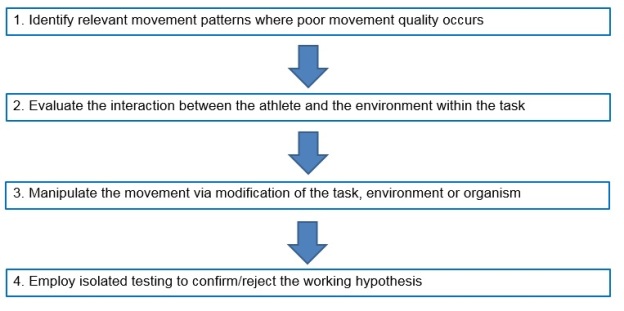
Figure 1. Screening process for identifying the primary cause of a compensatory movement strategy.
In the PSCJ paper, we used the squat to illustrate the practical application of this model. We did this because it is a relatively simple movement to demonstrate how the constraints-based approach may be used to identify movement faults. For this blog post, I thought I would expand on this and show how the model could be used for a few different movements with some practical examples. Hopefully this will achieve the following:
- Demonstrate the simplicity of the model.
- Show the adaptability of the model.
- Illustrate that for many coaches, they already use a similar strategy.
EXAMPLE 1: EXCESSIVE LUMBAR EXTENSION DURING THE OVERHEAD PRESS
PROBLEM: During the overhead press, an athlete drastically hyperextends the lumbar region of their spine at the final phase of the concentric portion of the lift. This has the potential to place excessive load on the posterior structures of the spine (i.e. facet joints).
CONSTRAINTS-BASED MANIPULATINON OF THE TASK: Have the athlete perform the overhead press whilst maintaining a posterior tilt of the pelvis that in turn, prevents lumbar extension. This can be done by having the athlete sit on the floor while they perform the overhead press (this might require the load to be adjusted for safety purposes).
FINDINGS INDICATE: If the athlete significantly reduces their ROM, the issue is likely driven by the axiohumeral muscles. My first guess (and that’s all it can be at this stage) would be tightness of the latissimus dorsi muscle as it extends the lumbar spine and anteriorly rotates the pelvis. Therefore, posterior rotation of the pelvis (which cause the lumbar spine to flex) would lengthen the latissimus dorsi leading to reduced shoulder elevation ROM. Other regions that may lack of mobility are:
- Poor thoracic spine extension.
- Limited flexibility in the sternal portion of the pectoralis major as flexing the lumbar spine (by sitting on the ground) pulls the rib cage down and therefore, lengthens the fibres that attach to the costal cartilage.
These could actually be identified by watching the movement carefully. If the thoracic spine doesn’t extend, it may be a contributing factor. If the infrasternal angle increases and an anterior rib flare occurs, the lower fibres of the pectoralis major might be causing the lumbar spine extension strategy.
ISOLATED TESTS: The following isolated tests would be used to confirm the hypothesis:
- Latissimus dorsi muscle length assessment.
- Occiput-to-wall test.
- Sternal fibers of pectoralis major muscle length assessment.
Check out this paper I wrote for SCJ to learn how to perform these tests:
EXAMPLE 2: BARBELL ROTATES DURING THE OVERHEAD PRESS
PROBLEM: When an athlete presses overhead, at the top of the movement the barbell rotates in the transverse plane but the athlete’s thorax remains facing forward (this is surprisingly common in my experience). This has the potential to improperly load the shoulder complex, as well as potentially loading the spine inappropriately.
CONSTRAINTS-BASED MANIPULATINON OF THE TASK: Same as above – overhead press in a seated position. If this makes the rotation worse, it is likely the latissimus dorsi again.
However, as I stated in the original paper, asymmetrical strategies tend to be driven by asymmetries in the pattern. In this case, artificially imparting more asymmetry in the system may make the strategy either more symmetrical or asymmetrical, which in turn would inform the coach of the primary driver.
For this example, have the athlete sit one ischial tuberosity (one buttock) on a small block (depending on the size of the athlete, an Eleiko 10kg plate works perfect). This puts the spine into a position of lateral flexion. So, if the right side of the pelvis is elevated relative to the left (right buttock is sitting on the 10kg plate), the lumbar spine is laterally flexed to the right. This lengthens the left lat relative to the right (try it – it definitely does!).
FINDINGS INDICATE: In this instance, if the rotation becomes exaggerated when performing the press seated on the floor, the lats are implicated. If no change occurs, then investigating other regions is required (i.e. thoracic spine, posterior scapulohumeral musculature, sternal fibres of pectoralis major, etc.).
If, when elevating the right side of pelvis, the barbell rotation worsens, the left latissimus dorsi is likely the issue as it is “pre-stretched” with the right lateral spine flexion. If the barbell rotation disappears (or reduces) with right pelvic elevation, then the right latissimus dorsi is likely tight as it is pre-shortened (relative to neutral pelvic position) with the right lateral spine flexion. This can be confirmed by elevating the left side of pelvis and retesting where the reverse finding would likely occur.
ISOLATED TESTS: The following isolated tests would be used to confirm the hypothesis:
- Latissimus dorsi muscle length assessment.
- Sternal fibers of pectoralis major muscle length assessment to rule out other contributing factors.
EXAMPLE 3: KNEE VALGUS DURING THE INITIATION OF A COUNTERMOVEMENT JUMP
PROBLEM: As the athlete initiates the downward phase of a countermovement jump (CMJ), their knees move into a functional valgus bilaterally. However, they correct the position as they begin to ascend during the jump. This may place strain on a number of structures around the patellofemoral and tibiofemoral joints.
CONSTRAINTS-BASED MANIPULATINON OF THE TASK: Have the athlete perform the CMJ with a small mini band around the knees.
FINDINGS INDICATE: During the initial decent of a CMJ, the force demands are below the amount required to maintain a standing position. In figure 2, I’ve shown a CMJ force profile. The red circled section represents the initial decent phase where force demands are very low. As it is at this point where the athlete demonstrates a knee valgus, we know that it can’t be due to a lack of strength as the force demands are minimal.
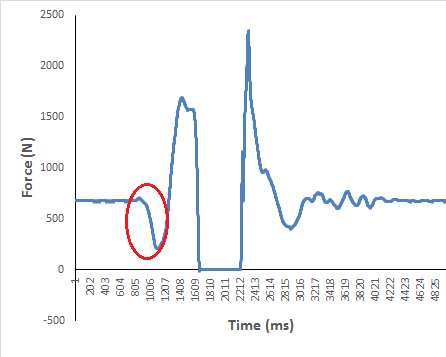
Figure 2. Countermovement jump force profile for an international gymnast. The circled section represents the initial descent phase of the movement.
Instead, it is likely an issue with pre-tensioning the gluteal musculature in the pattern. By adding the mini band, we increase the pre-tension in the gluteals prior to the descent. If the knee valgus strategy disappears or reduces, we know that it is a synchronisation issue with recruiting the lower extremity stabilisers.
If no change occurs in the pattern, other manipulations should be looked at. Another example may be to have the athlete perform the CMJ on a declined surface (such as a small hill with the athlete facing the bottom of the hill) to reduce the demands for ankle dorsiflexion ROM by elevating the heels relative to the forefoot. Note: I don’t recommend doing this with a block for a heel elevation due to safety issues when landing from the CMJ.
ISOLATED TESTS: The following isolated tests would be used to confirm the hypothesis:
- Hip abduction strength tests to rule out a strength issue.
- Weight-bearing lunge test to rule out a mobility issue at the ankles.
- Structural or alignment based tests to rule out other possible factors such as a forefoot varus.
EXAMPLE 4: POOR PELVIC STABILITY DURING RUNNING
PROBLEM: During the stance phase of running, the athlete demonstrates a large contralateral pelvic drop. This may place large stress on the lateral components of the tibiofemoral joint (via the increased knee varus moment)3 as well as some of the lumbopelvic structures due to the excessive motion in the frontal plane.
CONSTRAINTS-BASED MANIPULATINON OF THE TASK: Manipulate the athletes stride frequency. Start with a small increase in the stride frequency (5-10 steps per minute as an example) with a standard speed on a treadmill using a metronome for the athlete follow. This can be done whilst monitoring the athlete’s mechanics (i.e. tibial angle at touchdown) and heart rate (to determine the metabolic efficiency of the athlete with the adjusted stride pattern).
FINDINGS INDICATE: One potential factor here may be the stride length the athlete chooses to use during running. If the athlete uses a high stride length: frequency ratio, the result will be they have to cope with higher impact forces. If these forces surpass the capacity of the frontal lumbopelvic and hip stabilisers, then a contralateral pelvic drop may occur.
So if the higher stride frequency reduces the contralateral pelvic drop, the athlete’s movement strategy for running is the primary driver in this instance. If not, other manipulations should be used (see the next example).
ISOLATED TESTS: The following isolated tests would be used to confirm the hypothesis:
- Hip abduction and lateral trunk strength tests.
- Structural or alignment based tests to rule out other possible factors such as a forefoot varus.
EXAMPLE 5: EXCESSIVE PRONATION DURING RUNNING
PROBLEM: During the early portion of the stance phase during running, the athlete appears to excessively pronate at the foot complex causing a knee valgus more proximally. This has the potentially to aberrantly load numerous structures such as the Achilles and Patella tendon.
CONSTRAINTS-BASED MANIPULATINON OF THE TASK: This could easily be linked with a similar issue as in example 4. Manipulating the stride length: frequency ratio is one strategy that could be used to see if the high impact forces associated with long stride lengths are the driver.
Another strategy would be to have the athlete run on a track (could be done on a treadmill but you’d have to draw a line down the centre of the treadmill belt), focussing on their foot contacts being outside of a lane line. This would result in a widening of the stance relative to the location of the centre of mass (COM).
FINDINGS INDICATE: A possible cause for uncontrolled pronation during running is a cross-over gait.4 By having the athlete run either side of the lane line on a 400-m track, they are forced to engage their lateral pelvic stabilisers (gluteus medius, QLO, abdomals, etc.) and control the position of the COM relative to the stance foot.
If this constraint improves the athletes running pattern, then the synchronisation and recruitment of these key frontal and transverse plane stabilisers is the issue (or they do not possess the endurance to maintain control – this could be established by having the athlete perform the manipulation for a prolonged time period). If the pronation becomes exaggerated with stepping either side of the lane (i.e. a wider stance), excessive side-to-side shifting of the pelvis begins to occur, or a large contralateral pelvic drop appears, then the frontal plane stabilising muscles may lack the strength to control pelvic and lower extremity position during running.
To see this in action, check out this video (not sure about the intro music but these guys put out quality material):
https://www.youtube.com/watch?v=LG-xLi2m5Rc
ISOLATED TESTS: The following isolated tests could be used to confirm the hypothesis:
- Hip abduction and lateral trunk strength tests.
- Structural or alignment based tests to rule out other possible factors such as a forefoot varus.
CONCLUSION
With this post, I wanted to demonstrate the variety of ways this model could be applied for identifying movement issues in relevant patterns. We published the PSCJ article with the goal of stimulating the S&C coaches thinking for how the manipulation of constraints can inform us as to the movement profile the athlete presents with. This post has hopefully continued this and shown how simple it is to manipulate the constraints for a variety of movements.
REFERENCES
- Dill KE, Begalle RL, Frank BS, Zinder SM, and Padua DA. Altered knee and ankle kinematics during squatting in those with limited weightbearing- lunge ankle-dorsiflexion range of motion. J Athl Train, 49: 723-732. 2014.
- Frost DM, Beach TAC, Callaghan JP, and McGill SM. The influence of load and speed on individuals’ movement behavior. J Strength Condit Res, 29: 2417-2425. 2015.
- Takacs, J. and Hunt, M.A., 2012. The effect of contralateral pelvic drop and trunk lean on frontal plane knee biomechanics during single limb standing. Journal of biomechanics, 45(16), pp.2791-2796.
- Pohl, M.B., Messenger, N. and Buckley, J.G., 2006. Changes in foot and lower limb coupling due to systematic variations in step width. Clinical Biomechanics, 21(2), pp.175-183.
